VPS
Introducción
Con el Sistema de Posicionamiento Visual (VPS) de Niantic, los desarrolladores pueden crear ricas experiencias de RA de localización que superponen contenido virtual al mundo físico. Los contenidos WebAR pueden anclarse a lugares del mundo real, lo que permite a los objetos virtuales interactuar con su entorno físico. Esto hace que la experiencia de la realidad aumentada sea más personal, significativa y envolvente, y da a los usuarios nuevas razones para explorar el mundo que les rodea.
En Studio, hay varias herramientas y funciones que le ayudan a crear experiencias de Location AR (o habilitadas para VPS).
- Navegador Geoespacial: Busque, previsualice y seleccione entre diferentes ubicaciones habilitadas para VPS mediante el Navegador geoespacial. Más detalles en la sección Uso del navegador geoespacial.
- Ubicaciones en Studio: En la Jerarquía de Escenas, las "Ubicaciones" son un tipo de entidad que permite posicionar y configurar contenidos basados en el mundo real, cuando se añaden objetos como objetos hijos. Estos activos de ubicación sirven como guía visual para posicionar con precisión el contenido, los efectos y las interacciones sobre su escena, o se pueden utilizar como modelo de textura/3D, incluido como un activo en la escena. Para más información, consulte el apartado Desarrollo de experiencias de RA en localización.
- Simulador de localización AR: En el menú de opciones del Simulador, puedes seleccionar la Ubicación añadida a tu proyecto, y puedes ver y moverte por tu experiencia AR de ubicación mientras se reproduce. Para más detalles, consulte la sección Simulación de experiencias de realidad aumentada.
Para crear nuevas ubicaciones en las que desee activar Location AR, recomendamos a los desarrolladores que utilicen la Scaniverse App. Encontrará más detalles sobre el uso de Scaniverse y la solicitud de nuevas ubicaciones para la habilitación de VPS en la sección Creación de nuevas ubicaciones habilitadas para VPS más abajo.
Uso del navegador geoespacial
Lo que distingue a Niantic VPS es su creciente mapa global con más de 600.000 ubicaciones activadas por VPS, elaborado a partir de millones de escaneos enviados por la comunidad de desarrolladores y jugadores de Niantic. Estas ubicaciones centradas en el ser humano están optimizadas para interacciones de alta fidelidad y experiencias de RA inmersivas. La malla de cada ubicación se crea combinando docenas de escaneados individuales para formar un modelo 3D detallado y de alta calidad. Y como cada semana se añaden nuevos lugares, el mapa se amplía constantemente. Utiliza el navegador geoespacial disponible en Studio para buscar estas ubicaciones.
Se puede acceder al navegador geoespacial (GSB) desde el proyecto seleccionando el icono del mapa en la parte superior derecha de la ventana. Utilizando el GSB ampliado puede buscar ubicaciones activadas por VPS. Al seleccionar una ubicación activada por VPS se mostrará la malla 3D de la ubicación para que pueda verificar que ha seleccionado la ubicación correcta y añadirla a su proyecto.
Por defecto, TODAS las localizaciones, activadas o pendientes de activación VPS, se mostrarán cuando se realice una búsqueda inicial en el Navegador Geoespacial. Utilice la opción Filtro > Estado si desea ocultar las ubicaciones que aún no están activadas.
Si la ubicación que desea utilizar en su proyecto no está disponible como Ubicación VPS, puede crear la ubicación siguiendo las instrucciones de la sección Crear nueva ubicación.
Seleccione Añadir ubicación en la vista detallada para añadir la ubicación a su proyecto.
Filtrado por ubicación
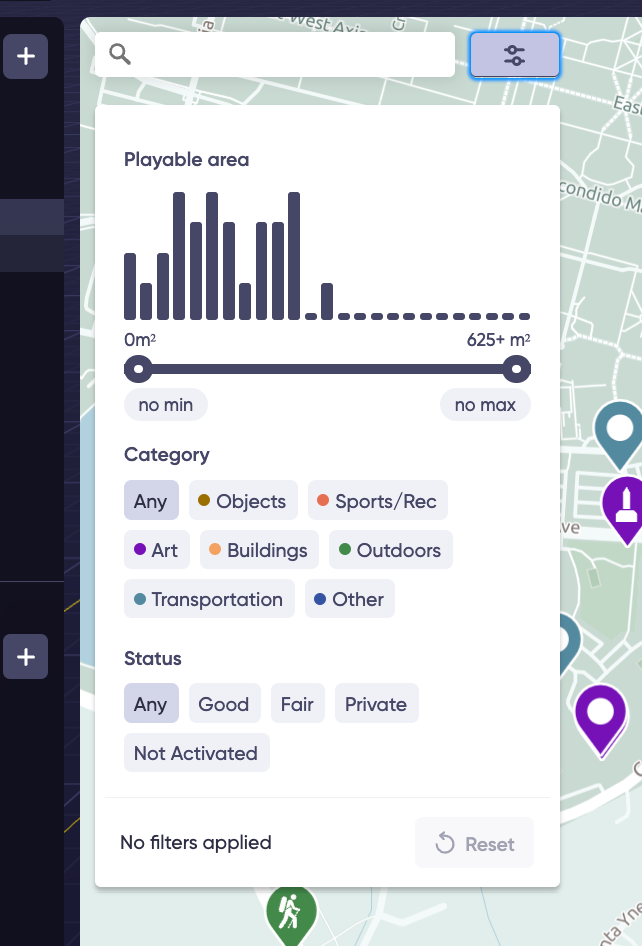
En el Navegador Geoespacial verás diferentes filtros de búsqueda que puedes aplicar, como el tamaño (Área jugable, Categoría y Estado VPS).
Estado: Se refiere a la capacidad de la Localización para localizar en cualquier momento. Después de que una Localización haya sido activada VPS, Niantic proporciona una clasificación de calidad en el navegador Geoespacial: Calidad Regular o Calidad Buena. Las ubicaciones con varias exploraciones en todo tipo de iluminación suelen tener una mayor calidad. Por defecto, TODAS las localizaciones, ya estén activadas por VPS o pendientes de activación, aparecerán cuando se busque inicialmente en el Navegador Geoespacial. Utilice las opciones del filtro Estado si desea ocultar las ubicaciones que aún no están activadas.
Nota: La calificación de la calidad es un proceso automatizado y puede no reflejar el rendimiento real de la Ubicación. La mejor manera de determinar la calidad es probarlo uno mismo.
Detalles de la ubicación
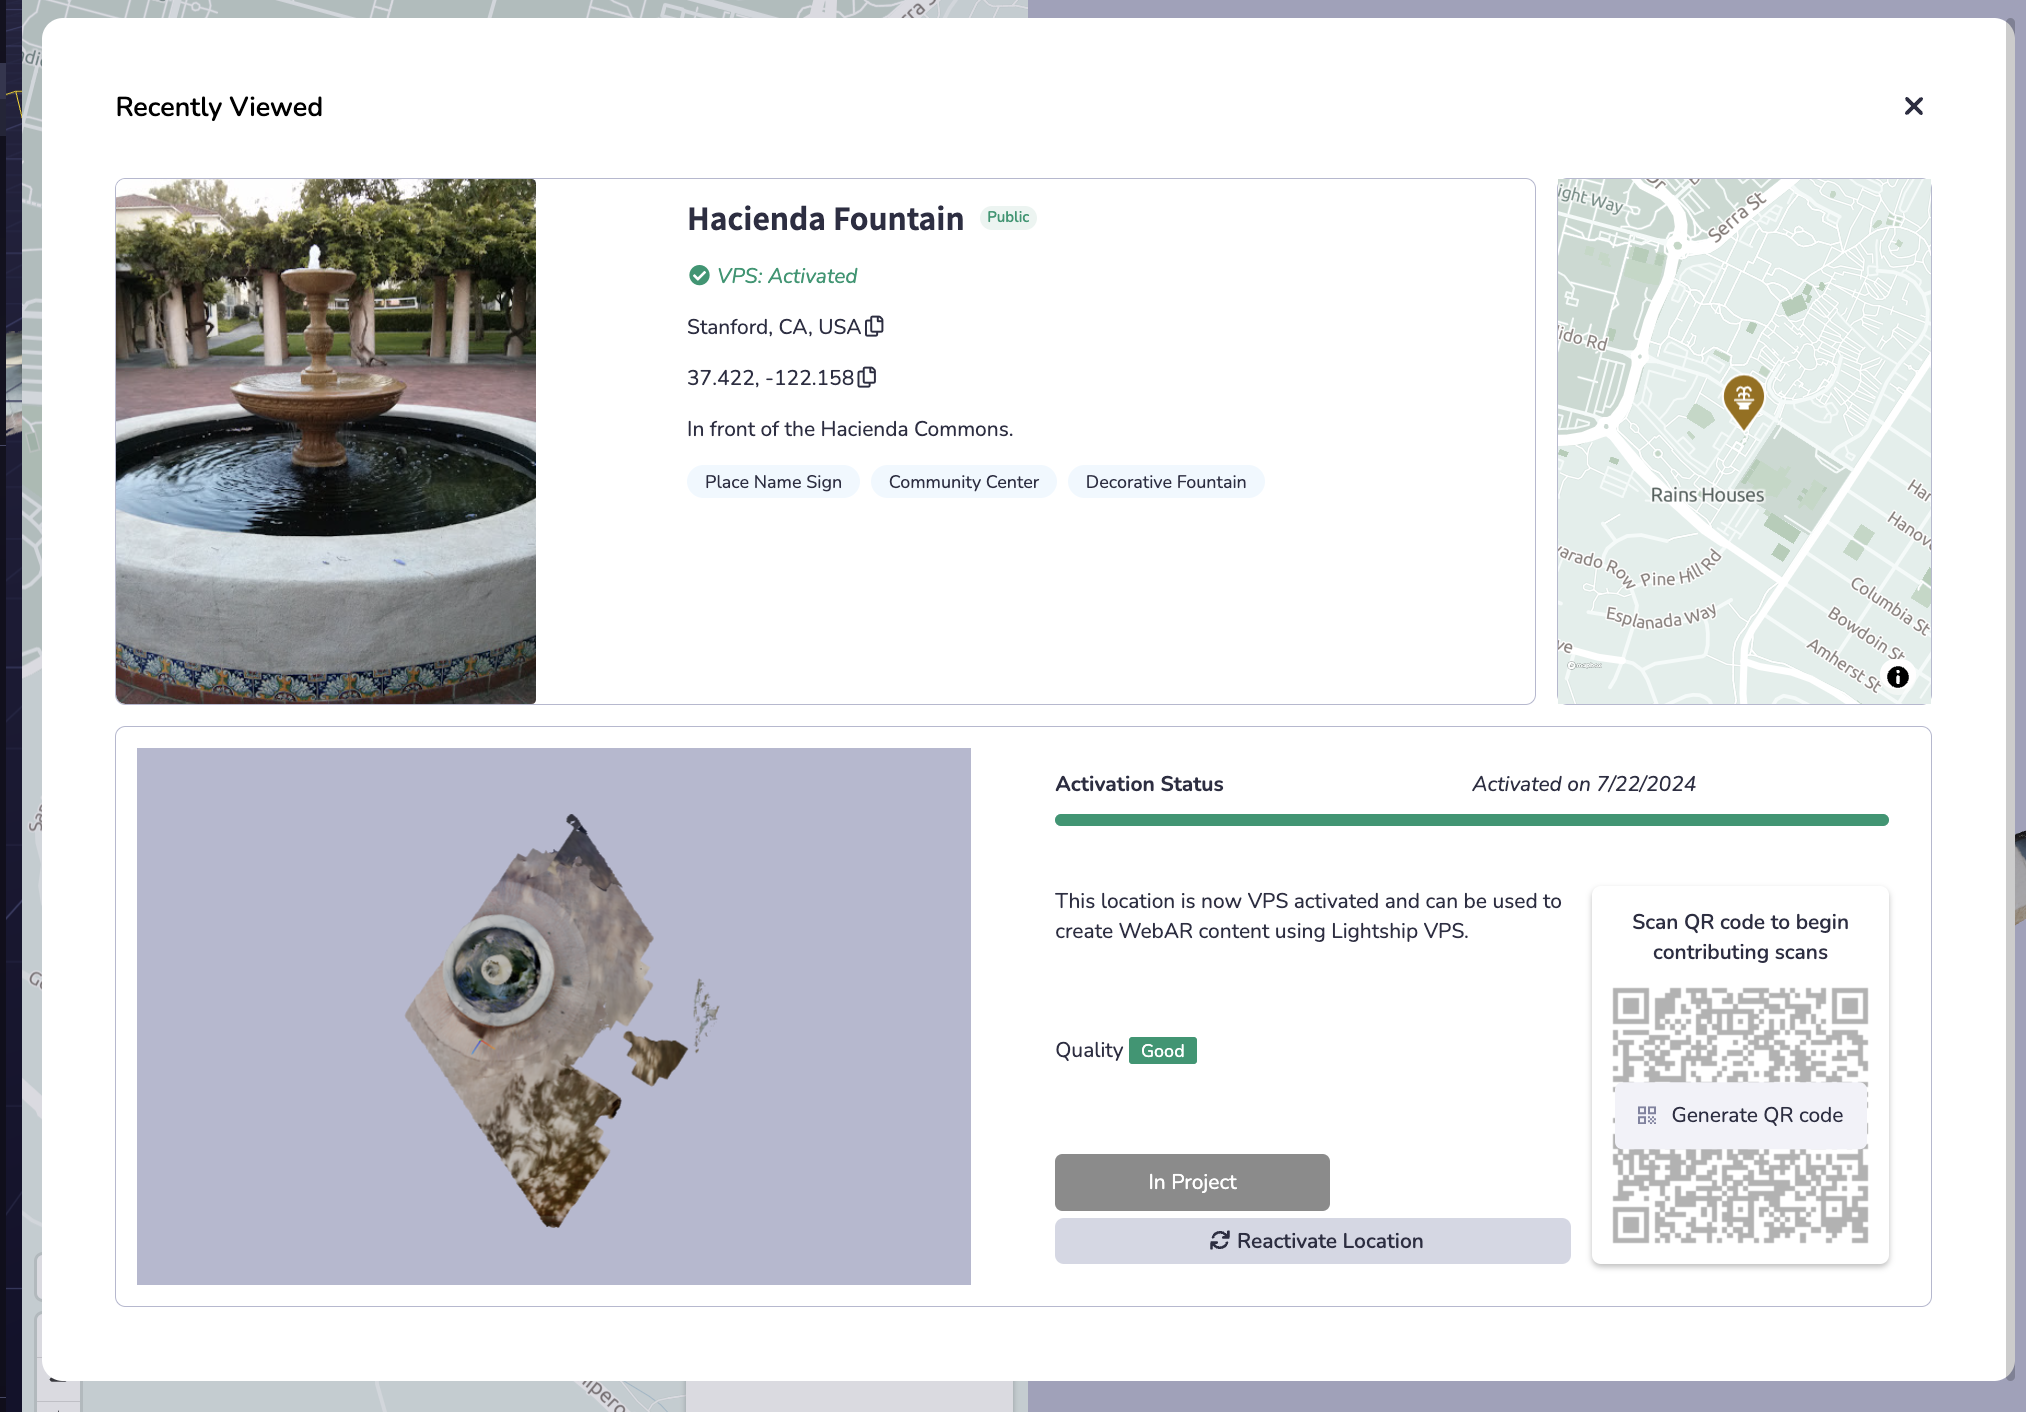
Al seleccionar una ubicación en el navegador geoespacial, puede obtener más información sobre su índice de calidad VPS, así como si se trata de una ubicación disponible públicamente o pendiente.
Tipo: En el Navegador Geoespacial, verá tres tipos diferentes de Localizaciones.
| Tipo | Icono | Descripción |
|---|---|---|
| Público |  | Las ubicaciones "públicas" han sido aprobadas por el equipo de confianza y seguridad de Niantic y han cumplido los criterios de seguridad y accesibilidad pública requeridos. Estas Ubicaciones pueden utilizarse en proyectos publicados. |
| Pendiente |  | "Pendientes" Las ubicaciones están siendo revisadas por el equipo de Confianza y Seguridad de Niantic para determinar si cumplen los criterios requeridos de seguridad y accesibilidad pública. **Las ubicaciones pendientes pueden escanearse y activarse mientras se espera a que finalice la revisión. |
| Rechazado |  | Las Ubicaciones "Rechazadas" pueden no haber superado la revisión de Confianza y Seguridad de Niantic, ser un duplicado de una Ubicación existente o previamente rechazada, o no estar permitidas por Niantic por otro motivo. Estas ubicaciones no pueden añadirse a los proyectos. |
| Prueba |  | "Solo podrás acceder a las ubicaciones de prueba desde tu espacio de trabajo si escaneas la ubicación con la aplicación Wayfarer de Niantic. Las ubicaciones de prueba están pensadas para su uso durante el desarrollo y no pueden incluirse en un proyecto publicado. |
Para preguntas o problemas relacionados con la creación de Ubicaciones VPS, o para comprobar el estado de las Ubicaciones existentes y existentes, por favor contacte con support@nianticspatial.com.
Estado de la Ubicación: En el Navegador Geoespacial, verá cinco estados diferentes para las Ubicaciones VPS:
En el Navegador Geoespacial, verá cinco estados diferentes para las Ubicaciones VPS:
| Estado | Icono | Descripción |
|---|---|---|
| No activado | Las ubicaciones con el estado "No activado" no han recibido ninguna exploración. Para poder solicitar la activación, es necesario enviar un mínimo de 10 escaneos viables de la ubicación. Después de enviar un escaneado, el estado de la ubicación cambiará a "Escaneando". | |
| Escaneado |  | Las ubicaciones con el estado "Escaneando" han recibido al menos un escaneado. Para poder solicitar la activación, es necesario enviar un mínimo de 10 escaneos viables de la ubicación. |
| Tratamiento |  | Las ubicaciones con el estado "En proceso" han recibido una solicitud de activación y mostrarán el estado "En proceso" hasta que el proceso de activación haya finalizado. **Normalmente, una solicitud de activación se completa en 4 horas. Recibirás un correo electrónico cuando el proceso haya finalizado. |
| Activo | Las ubicaciones con un estado "Activo" están disponibles para ser utilizadas en proyectos para crear contenido WebAR utilizando VPS para Web. | |
| Fallido | Las ubicaciones con el estado "Fallido" han encontrado un problema durante el proceso de activación. Esto puede deberse a varios factores, como la inadecuación de la ubicación para el VPS, escaneos insuficientes o datos corruptos. Desafortunadamente esto significa que esta Ubicación no puede ser usada para crear contenido WebAR usando VPS. Le animamos a que busque una nueva ubicación para su proyecto del 8º Muro. |
Si tiene preguntas o problemas relacionados con la búsqueda de ubicaciones, la activación o el estado, póngase en contacto con support@nianticspatial.com
Aviso de desalineación: La advertencia de no alineado puede ocurrir por varias razones y significa que la localización contra la malla no puede ser garantizada. Aunque la malla puede funcionar bien para la localización, la advertencia indica que la malla es experimental y debe utilizarse bajo su propia responsabilidad. Nota: Todas las exploraciones de prueba están desalineadas. Si la ubicación que desea utilizar en su proyecto no está disponible como Ubicación VPS, puede crear la ubicación siguiendo las instrucciones de la sección Crear nueva ubicación.
Desarrollo de experiencias VPS
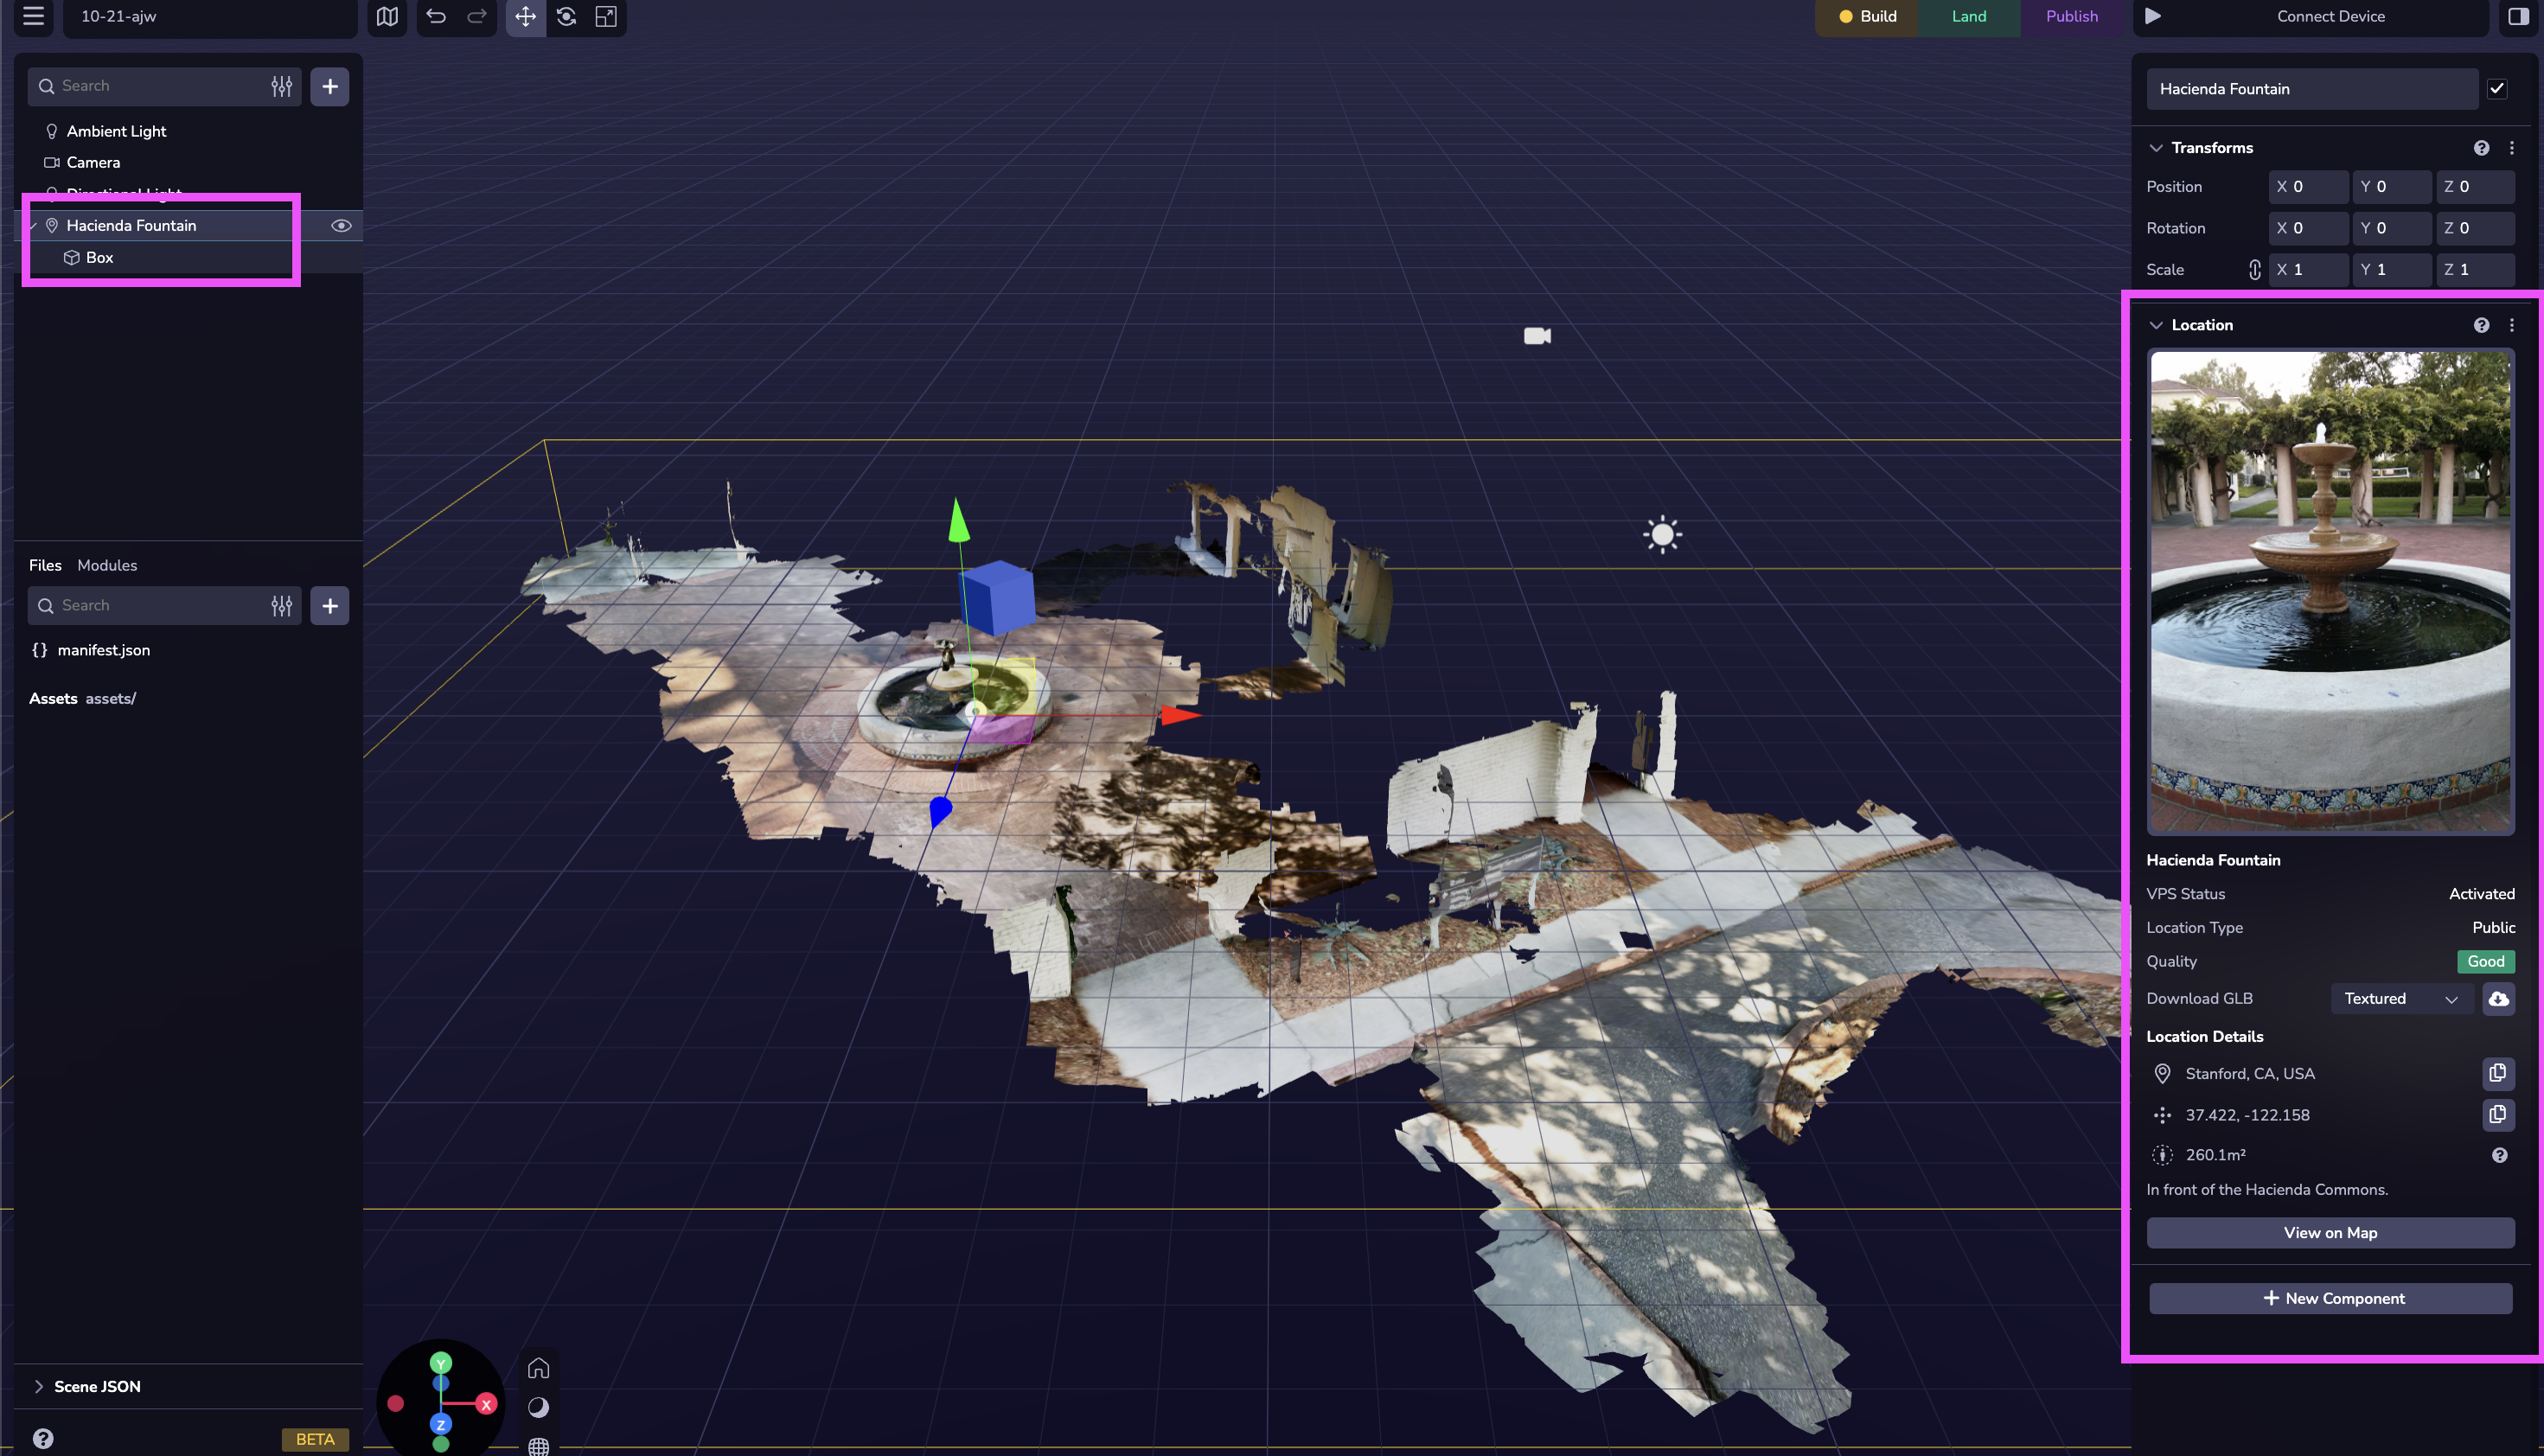
Cuando añada una Ubicación activada por VPS a su proyecto, verá que la Ubicación aparece en su Jerarquía de Escenas. Una vez que tenga una Ubicación en su proyecto, puede inspeccionar los detalles de esa ubicación utilizando el panel derecho. Aparecerá una malla de ubicación para que pueda alinear y posicionar otros contenidos 3D con respecto a la ubicación.
Ubicación Entidades
Para que los objetos de la escena estén correctamente alineados con la localización después de la localización, los objetos deben añadirse como hijos a la Entidad de Localización.
Las ubicaciones son un tipo único de entidad dentro de Studio. Estas ubicaciones vienen con una malla 3D visual en la ventana gráfica para fines de colocación de contenidos y pruebas, pero en realidad no añadir un activo de malla en su proyecto.
En la vista Inspector puede ver detalles de la ubicación como el estado, el tipo, la calidad, los identificadores y el activo de malla GLB correspondiente disponible para su descarga. Más información sobre el uso del archivo Location GLB a continuación.
Se pueden añadir otras entidades como objetos hijos de un objeto Ubicación. Para cualquier contenido que sólo deba aparecer después de la localización, debe añadirlo como entidad hija.
Los componentes por defecto de Studio, como Mesh, Physics Colliders, etc., no serán compatibles con la entidad Location. No intente añadirlos directamente a la entidad Ubicación, ya que puede experimentar problemas en tiempo de ejecución con la habilitación VPS, la localización o las interacciones de contenido.
Ubicación GLB
Un objeto Ubicación te da la opción de descargar directamente un archivo GLB (malla) que puedes introducir en tu escena como un activo. Puede utilizar el activo para configurar oclusores, crear efectos de texturas superpuestas o crear capas de física. La función de descarga GLB te da la opción de descargar con textura o sin ella.
Algunas ubicaciones habilitadas para VPS con una gran superficie, pueden tener tamaños de archivo GLB muy grandes, superiores a 50 MB. Esto puede ser problemático para el rendimiento, especialmente cuando hay muchos otros activos o activos de gran tamaño en la escena. Tenga en cuenta el tamaño del archivo de la descarga GLB cuando lo utilice como un activo dentro del proyecto.
En algunos casos es posible que desee llevar el GLB a una herramienta de edición 3D de terceros como Maya o Blender.
IMPORTANTE: El origen de este modelo 3D es el origen de la Localización. No restablezca el origen o su contenido no estará alineado.
Ubicación Eventos
8th Wall emite eventos en distintas fases del ciclo de vida de la localización del proyecto (por ejemplo, escaneado, encontrado, actualizado, perdido, etc.). Consulte la referencia de la API para obtener instrucciones específicas sobre la gestión de estos eventos en su aplicación web.
Localización de RA para usuarios finales
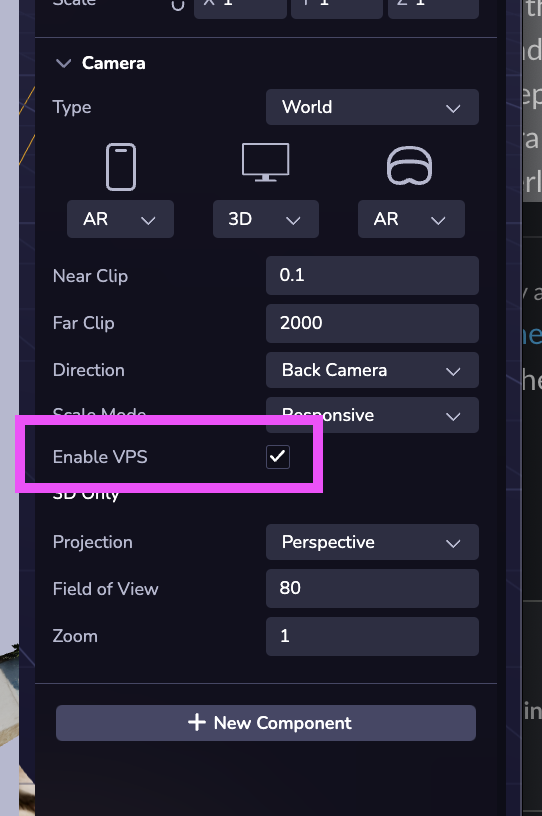
Para que funcione el VPS, es necesario actualizar la configuración de su cámara.
Simulación de experiencias de realidad aumentada
Con el simulador de Studio, puedes probar tus experiencias a distancia sin moverte del escritorio. El simulador de Studio te permite simular el movimiento dentro de tu escena mediante sencillos controles WASD y orbitales para ver cómo interactúan los elementos WebAR con el entorno real y asegurarte de que todo funciona como se espera antes de su despliegue. Esta capacidad reduce el tiempo de iteración y facilita el perfeccionamiento de la experiencia.
Al actualizar el Simulador en una Ubicación, puede que veas una pantalla blanca. Si esto ocurre, tendrás que actualizar de nuevo para volver a la vista Ubicación.
Uso del simulador con ubicaciones habilitadas para VPS
Para simular el movimiento y la colocación de contenidos en una Ubicación añadida a su escena:
- Asegúrese de que la configuración de la cámara se establece en Mundial con VPS activado. Consulte la configuración de la cámara para VPS más arriba.
- Pulsa Play para abrir el Simulador
- Utilice las opciones del entorno del Simulador (selector inferior izquierdo) para encontrar la Ubicación del Proyecto deseada.
- Para Simular VPS, utilice el evento Localización Encontrada para simular una localización exitosa. IMPORTANTE: los objetos hijos de la entidad Ubicación que está simulando NO aparecerán hasta que se dispare el evento Ubicación Encontrada. Puedes utilizar otros Eventos de Localización y Malla para simular otros escenarios (como Localización Perdida). Para más información sobre eventos VPS consulte la sección API de Eventos de Localización.
- La localización no manual (anulación de la selección de eventos manuales) no está disponible en el simulador por el momento, pero lo estará próximamente.
- Tanto los atajos de teclado WASD como los controles Orbit están disponibles para simular el movimiento. Primero debe hacer clic en el panel Simulador y, a continuación, puede utilizar los atajos de teclado y el controlador orbital.
- W = Adelante
- A = Izquierda
- S = Hacia atrás
- D = Derecha
- Q = Arriba
- E = Abajo

Para ciertas localizaciones es posible que no aparezca la Localización en el Simulador. Algunas mallas VPS están desplazadas lejos del origen, y o fuera de la vista inicialmente en el Simulador. Utiliza los controles de Órbita para moverte y encontrar tu malla de Localización en el caso de que veas una pantalla negra. Para obtener más consejos, trucos y problemas conocidos, consulte la sección Problemas conocidos de VPS y Preguntas frecuentes más abajo.
Crear nuevas ubicaciones habilitadas para VPS
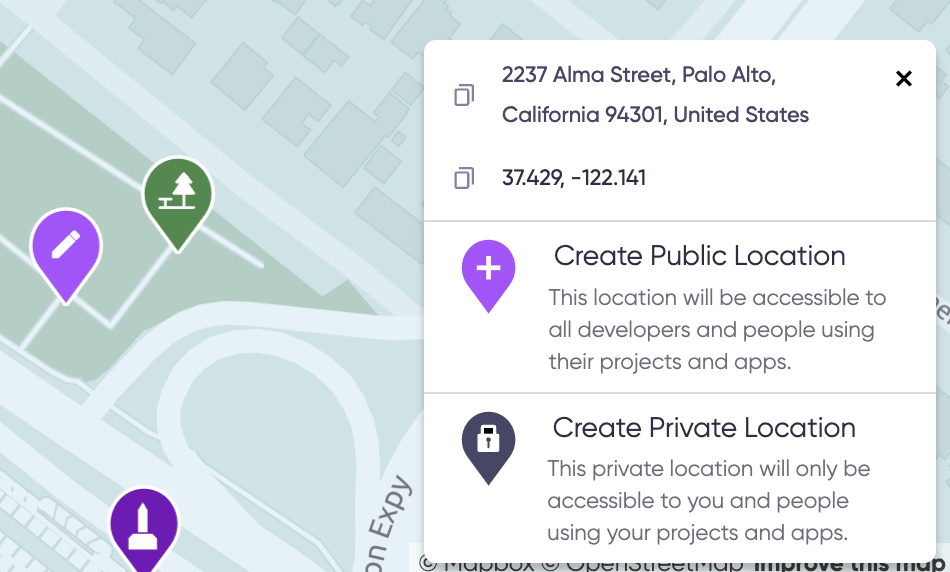
- Haga clic en un punto abierto del mapa para seleccionar dónde desea crear una nueva Ubicación VPS. Consulte Requisitos de ubicación de VPS para obtener más información sobre cómo elegir un buen lugar para crear una ubicación de VPS.
- Haga clic en Crear ubicación pública para iniciar el proceso de creación de la ubicación. Las ubicaciones públicas son accesibles a todos los desarrolladores y personas que utilicen sus proyectos. Cuando añada una nueva Ubicación Pública, tenga en cuenta las siguientes directrices:
- Los Lugares Públicos deben ser lugares u objetos físicos permanentes, tangibles e identificables.
- Las ubicaciones públicas deben ser seguras y accesibles al público peatonal.
- Asegúrese de incluir información precisa en el título, la descripción y la foto para ayudar a sus usuarios a encontrar la ubicación.
Los espacios de trabajo del plan Pro también tendrán la opción de Crear ubicación privada. Las Ubicaciones Privadas sólo serán visibles y accesibles para su espacio de trabajo y sus proyectos. Las Ubicaciones Privadas son una característica premium para desarrolladores que necesitan crear experiencias VPS especiales de acceso controlado o temporales.
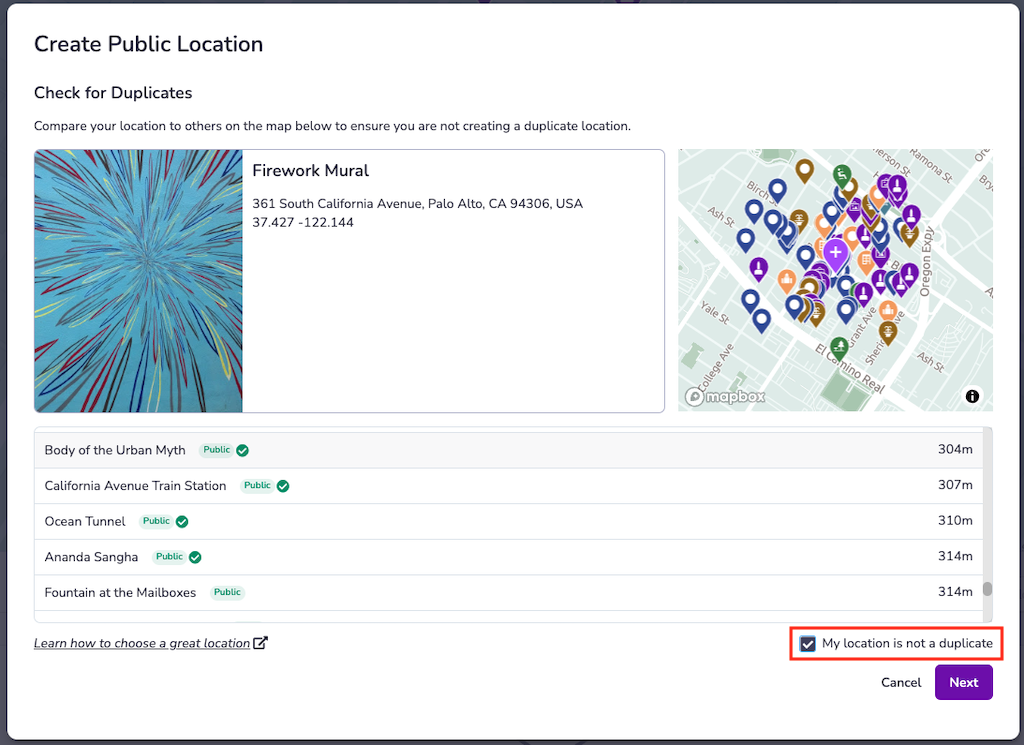
- Comprobar si hay duplicados: Antes de crear una nueva Ubicación, es necesario que compruebe que su Ubicación no existe ya. Compare su Ubicación deseada con otras que ya estén en el mapa para asegurarse de que no está creando un duplicado. Si no se trata de una Ubicación duplicada, debe marcar la casilla Mi Ubicación no es un duplicado y hacer clic en el botón Siguiente para continuar.
- Añadir información de localización: Los metadatos de localización serán visibles para los desarrolladores que utilicen el navegador geoespacial y podrán ser visibles para los usuarios finales. Recuerda que el equipo de Confianza y Seguridad de Niantic utiliza la información que proporcionas para determinar si la Ubicación cumple nuestros criterios para hacerse pública disponible. Una vez que haya añadido la siguiente información para la Ubicación que está intentando crear, haga clic en el botón Submit:
- Título (125 caracteres)
- Descripción (250 caracteres)
- Categoría (1 o más)
- Imagen (si está disponible)
- Utilice la aplicación Scaniverse iOS para completar el proceso de creación de la ubicación.
Scaniverse para desarrolladores de Niantic
Scaniverse para desarrolladores de Niantic integra a la perfección el navegador geoespacial (GSB) con la galardonada experiencia de escaneado de Scaniverse. Esta dirección agiliza considerablemente los flujos de trabajo de los desarrolladores en torno a la navegación por el mapa, la adición de ubicaciones y, por supuesto, la exploración de :
- Hemos adaptado el navegador geoespacial (GSB) para que se pueda utilizar en a Scaniverse para navegar por el mapa, inspeccionar ubicaciones, añadir ubicaciones y solicitar la activación de VPS.
- Flujo de inicio de sesión simplificado mediante un simple código QR que vincula Scaniverse con su cuenta de 8th Wall.
- Hemos adoptado la interfaz de usuario de Scaniverse para facilitar la creación y carga de escaneados.
- Hemos habilitado la localización de pruebas en ubicaciones activadas por VPS dentro de Scaniverse
- Hemos integrado nuestras últimas mejoras en el filtrado de mapas para que le resulte más fácil que nunca encontrar la ubicación o ubicaciones de que está buscando.
Vinculación de Scaniverse con el navegador geoespacial (GSB)
Requisito: Instalar Scaniverse desde iOS App Store. Pronto habrá compatibilidad con dispositivos Android.
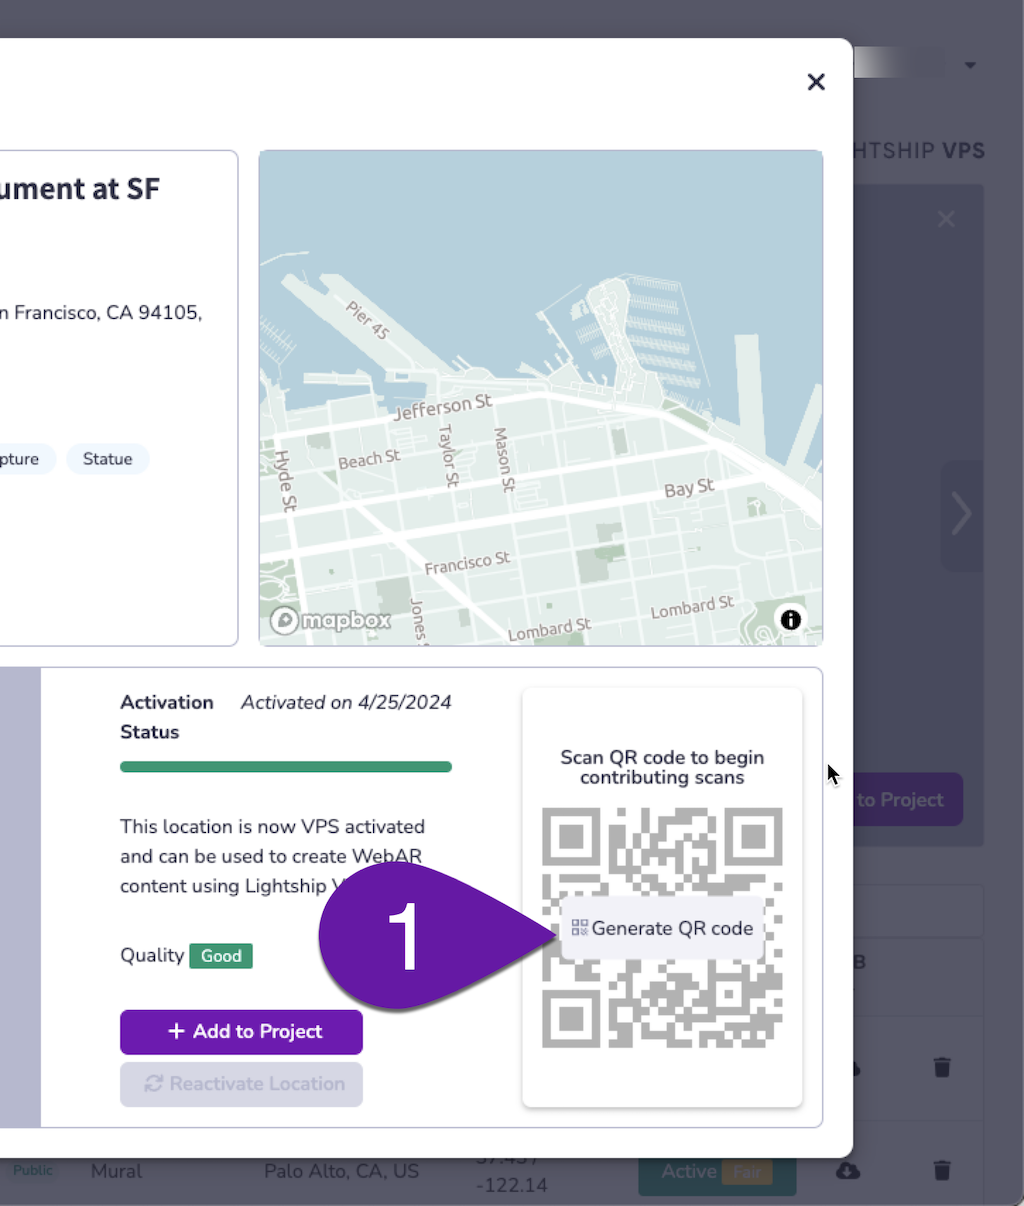
- Accede a tu cuenta de 8th Wall desde tu ordenador. Abra el Navegador geoespacial (GSB), seleccione cualquier ubicación en el mapa y, a continuación, seleccione Ver detalles. En la esquina inferior derecha de la tarjeta de detalles de la ubicación , pulse Generar código QR. Aparecerá un código QR.
-
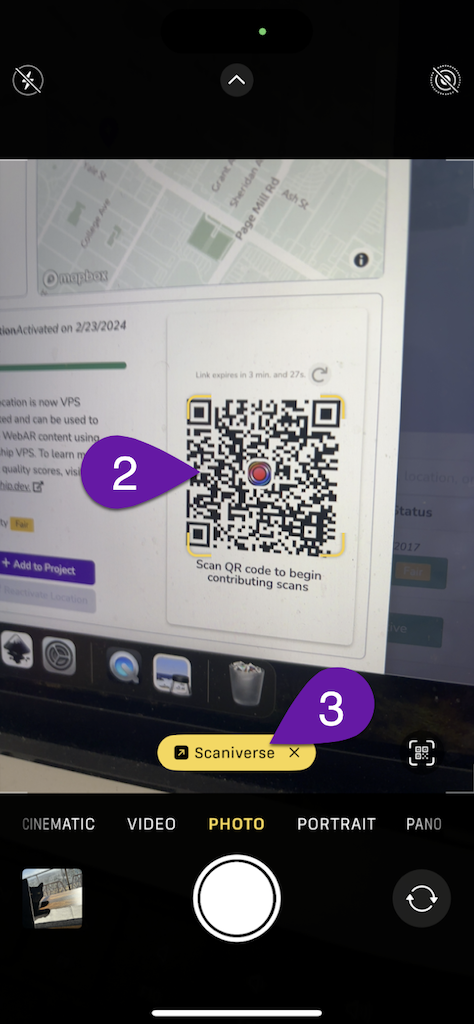
Escanea el código QR con tu aplicación Cámara. Abre la aplicación Cámara de tu teléfono y apunta al código QR.
-
Pulse sobre el enlace Scaniverse que aparece. Esto vinculará Scaniverse con tu cuenta de desarrollador de 8th Wall . Sólo hay que hacerlo una vez.
informaciónAsegúrese de permitir que www.8thwall.com utilice su ubicación actual cuando se le solicite; esto es necesario para el correcto funcionamiento de la interfaz GSB.
-
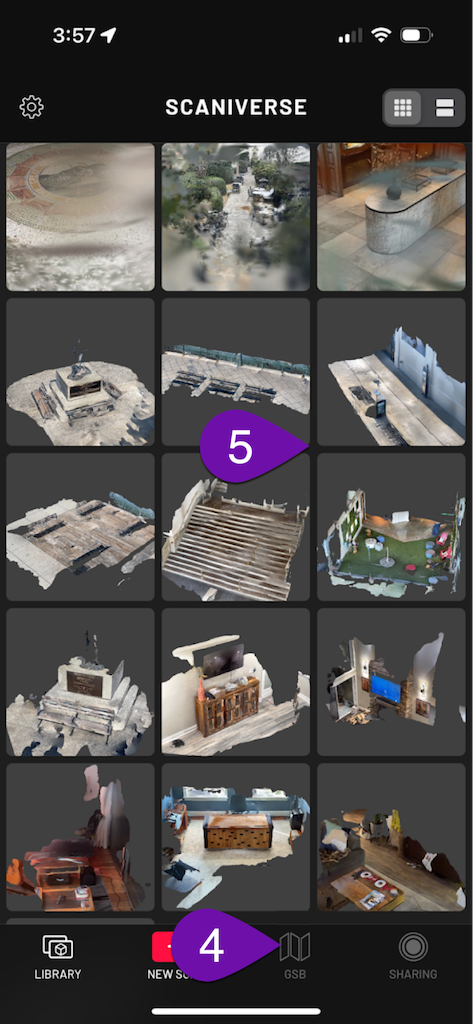
Una vez que haya vinculado Scaniverse a GSB, podrá volver a la pantalla GSB en cualquier momento pulsando el botón GSB en la cinta inferior de la aplicación Scaniverse. Tenga en cuenta que puede desvincular Scaniverse de GSB en cualquier momento accediendo al menú Configuración y desactivando la opción **Modo desarrollador de Niantic **.
-
Todos los escaneos que hayas realizado fuera del Modo Desarrollador de Niantic seguirán siendo accesibles cuando vincule/desvincule Scaniverse con GSB.
Navegar por el mapa GSB en Scaniverse
-
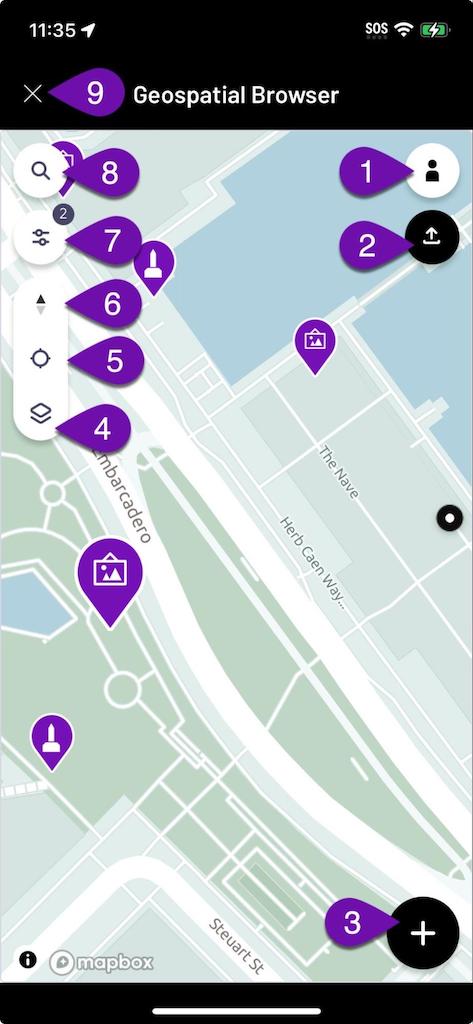
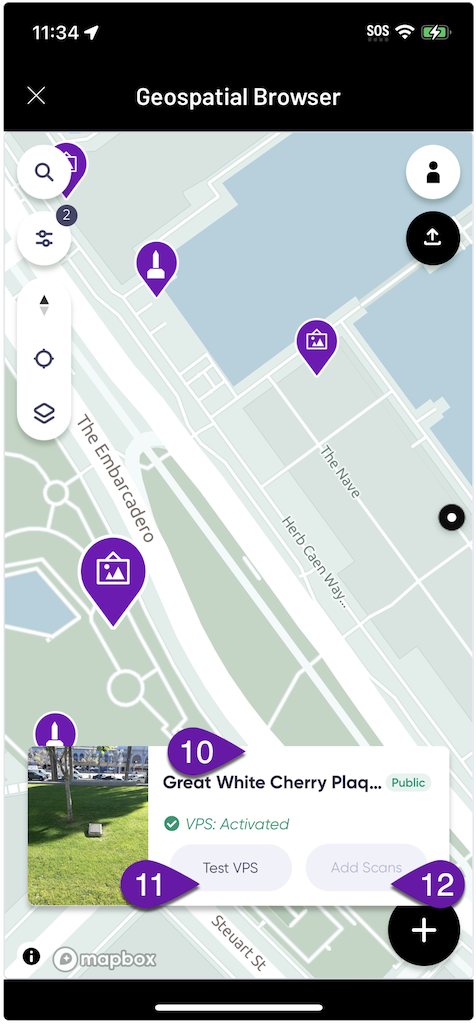
Pulsando sobre el icono Persona podrá seleccionar su 8º Espacio de Trabajo en la Pared.
-
Si pulsa el botón cargar podrá seleccionar la ubicación de los escaneos que desea cargar. Tenga en cuenta que sólo los escaneos que se originan desde el Modo Desarrollador de Niantic (utilizando las opciones Añadir Escaneos o Escaneo de Prueba) pueden ser cargados a Niantic para propósitos de activación de VPS.
-
Si pulsa el botón Plus podrá crear nuevas ubicaciones y realizar exploraciones de prueba.
-
Si pulsa el botón Capas, se activará la vista por satélite del mapa.
-
Al tocar el botón Reticule, el mapa se centrará en su ubicación.
-
Si pulsa el botón Brújula, el mapa volverá a su orientación por defecto, norte arriba.
-
El botón Controles le permitirá aplicar filtros a las localidades que aparecen en el mapa en función de su tamaño, categoría o estado de activación.
-
El botón Lupa le permitirá buscar en el mapa.
-
Al pulsar el botón X se cerrará el GSB y volverá a la pantalla de inicio de Scaniverse.
-
Al seleccionar una ubicación en el mapa aparecerá una pantalla de Previsualización, que puede pulsarse para obtener más detalles en .
-
Si ha seleccionado una localización activada por VPS, puede pulsar el botón Probar VPS para verificar que la localización funciona.
-
Para crear una exploración y añadirla a una ubicación concreta, pulse el botón Añadir exploraciones de la ubicación correspondiente en . Tenga en cuenta que debe estar cerca de la ubicación para que la opción Añadir exploraciones esté disponible.
Crear y cargar escaneos
-
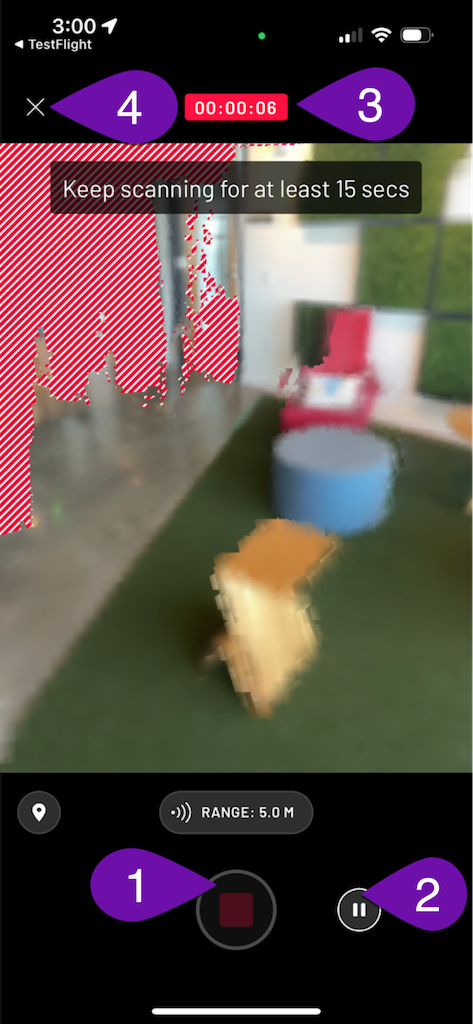
El botón Grabar se utiliza para iniciar y detener el proceso de escaneado.
-
El botón Pausa puede utilizarse para suspender temporalmente el proceso de escaneado si se desea.
-
La pantalla Tiempo indica la duración de la exploración actual. Se requiere una duración mínima de 15 segundos para que un escaneo sea viable para su carga con fines de desarrollo VPS. Lo ideal es una exploración de 30-60 segundos (las exploraciones de más de 60 segundos se dividen en varios fragmentos para procesarlas en ).
-
Si pulsa el botón X volverá a la pantalla de inicio de Scaniverse.
-
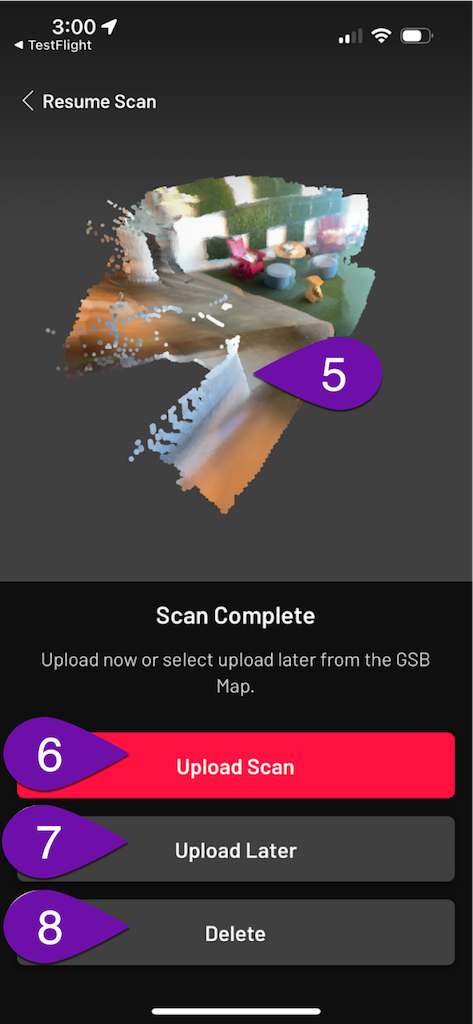
Cuando haya completado un escaneo, podrá inspeccionar una Malla de Revisión de la escena que capturó.
-
Si está satisfecho con su escaneado, puede cargarlo inmediatamente pulsando el botón **Cargar escaneado de **.
-
También puede elegir Descargar más tarde si desea utilizar una conexión WiFi (recomendado).
-
Si no está satisfecho con su escaneado, puede descartarlo pulsando el botón Borrar.
En la página Mapa, seleccione una Ubicación VPS para añadir una exploración a una Ubicación pública (1), o seleccione Exploración para añadir una exploración de prueba a su espacio de trabajo (2).
El procesamiento de las exploraciones puede tardar entre 15 y 30 minutos. Una vez procesadas, las exploraciones aparecerán en el navegador geoespacial.
Las cuestiones relacionadas con la digitalización o el tratamiento deben dirigirse a support@nianticspatial.com.
Técnica de escaneado
Las ubicaciones activadas por VPS escaneadas no deben tener más de 10 metros de diámetro alrededor de la ubicación. Por ejemplo, una estatua típica funcionaría como una Ubicación activada por VPS. Un edificio entero, sin embargo, no lo haría. Una cara o puerta/entrada a un edificio podría funcionar. Recomendamos empezar por con zonas más pequeñas (por ejemplo, un escritorio, una estatua o un mural).
Antes de escanear, sea consciente de su entorno y asegúrese de que tiene derecho a acceder a la ubicación que está escaneando.
-
Compruebe el área que se va a explorar y los alrededores del objeto explorado para determinar si hay algún obstáculo y para seleccionar una ruta de exploración. Es necesario planificar la ruta que pretende utilizar para la exploración antes de iniciar el procedimiento.
-
Asegúrate de que tu cámara está enfocada. El movimiento de la cámara puede afectar negativamente a la reconstrucción 3D. Mantén tu teléfono lo más cerca posible de tu costado para evitar el desenfoque. Camine alrededor del objeto que está escaneando en en lugar de quedarse parado en un lugar y mover el teléfono.
-
Camine a un ritmo lento y natural. Muévase lenta y suavemente durante la exploración. Los cambios bruscos de dirección son un no-no definitivo. Muévete lenta y suavemente con los pies en el suelo. Si escanea en en un entorno oscuro, es aún más importante moverse lenta y suavemente. Mueva el teléfono con usted mientras se mueve (piense en caminar como un cangrejo).
-
VPS La ubicación debe ser siempre el punto central. Para que podamos construir el mapa, es importante centrarse en la Localización VPS y capturar la órbita completa de 360° de la misma. Si no es seguro o no es posible obtener una cobertura de 360°, capta todo lo que puedas.
-
Varía la distancia/ángulo (0-10 m o 0-35 pies). Para que el mapa 3D funcione bien en diferentes escenarios de , es importante que capturemos el entorno que rodea la Localización y dispongamos de una variedad de escaneos diferentes. Es importante variar la distancia y los ángulos al explorar la Ubicación.
Vídeo de la técnica recomendada de escaneado de ubicaciones VPS:
Cosas que hay que evitar al escanear
-
Evite escanear cuando el entorno no sea seguro, por ejemplo, en medio de la carretera o en un parque infantil con niños.
-
Evite escanear cuando la Localización esté demasiado lejos (>10m o 35ft) o sea demasiado grande para enfocarla con su cámara .
-
Evite escanear mientras pasea o hace footing. Es importante mantener la ubicación como punto central en todo momento.
-
Evita apuntar con el teléfono a objetos muy brillantes, como una luz fluorescente o el sol.
-
Evite no moverse o moverse demasiado rápido mientras explora. Los movimientos bruscos provocarán desplazamientos en la reconstrucción de .
-
Evita escanear si el teléfono se calienta demasiado. Si la temperatura del dispositivo aumenta demasiado, el rendimiento de se reducirá considerablemente, lo que afectará negativamente a la exploración.
-
Evite subir escaneos que parezcan incompletos o poco representativos de lo que intenta escanear en .
VPS Problemas conocidos y FAQ
VPS en Studio Problemas conocidos:
- Es posible que en algunos lugares la ubicación no aparezca inicialmente en el simulador. Algunas mallas VPS están desplazadas lejos del origen y fuera de la vista inicial en el simulador. Utiliza los controles Orbit o los atajos de teclado WASD para moverte y encontrar tu malla de localización en el caso de que veas una pantalla negra. Vea más detalles en la sección Simulación de experiencias de RA en localización.
- Al actualizar el Simulador en una Ubicación, es posible que aparezca una pantalla blanca. Si esto ocurre, puede actualizar por segunda vez para volver a la vista Ubicación. Vea más detalles en la sección Simulación de experiencias de RA en localización.
- Para algunas ubicaciones habilitadas para VPS, normalmente las de gran superficie, el tamaño del archivo de malla GLB correspondiente puede ser muy grande, superior a 50 MB. Esto puede ser problemático para el rendimiento, especialmente cuando hay muchos otros activos o activos de gran tamaño en la escena. Tenga en cuenta el tamaño del archivo de la descarga GLB cuando lo utilice como activo dentro del proyecto. Ver más detalles en la sección Desarrollo de experiencias VPS.
- Actualmente, el flujo de trabajo Scaniverse Create Location sólo está disponible en iOS. Android llegará pronto. Vea más detalles en la sección Crear nuevas ubicaciones habilitadas para VPS.
¿Qué es Lightship VPS?
Lightship VPS (Visual Positioning System) es un servicio en la nube que permite a las aplicaciones localizar el dispositivo de un usuario de en ubicaciones del mundo real, lo que permite a los usuarios interactuar con contenidos de RA persistentes y impulsar nuevas experiencias inmersivas. VPS determina la posición y orientación (pose) del dispositivo mediante haciendo referencia a los datos de mapas que existen en la nube de Niantic.
¿Cómo funciona el VPS?
Cuando un dispositivo hace una llamada al servicio VPS, éste recibe una imagen de consulta del dispositivo del usuario junto con su ubicación aproximada (a partir del GPS) como datos de entrada e intenta localizarlo utilizando el mapa o mapas que existan en esa ubicación. Si la localización se realiza correctamente, el servicio devuelve la posición y orientación (pose) del dispositivo correspondientes a la marca de tiempo de la imagen que se transmitió . Dado que existe un retardo entre el momento en que se captura una imagen de consulta VPS y el momento en que se recibe una respuesta del servicio VPS, el dispositivo necesita disponer de un sistema de seguimiento del movimiento en para mantenerse localizado con precisión mientras se mueve. Cuando el servicio VPS devuelve una estimación de pose al dispositivo , la diferencia de pose del sistema de seguimiento del dispositivo se añade a la respuesta de localización para que VPS pueda "seguir" el movimiento del dispositivo mientras espera la respuesta del servidor a la consulta VPS.
¿Qué es una exploración?
Los escaneos AR de jugadores, desarrolladores y topógrafos son el ingrediente fundamental utilizado para crear el Niantic Map: El mapa 3D del mundo de Niantic. Los escaneos AR se registran y cargan utilizando el marco de escaneado AR de Niantic, que es un módulo utilizado dentro de Pokemon Go, Ingress y la aplicación Wayfarer. Cada exploración de AR consiste en una serie de fotogramas de vídeo con datos de apoyo procedentes de acelerómetros y sensores GPS que construyen un modelo 3D del mundo a partir de múltiples imágenes 2D. Niantic utiliza los escáneres de realidad aumentada para crear mapas y mallas de lugares del mundo real en .
¿Qué es un mapa?
En la jerga de VPS, un mapa es el artefacto de datos que se utiliza para localizar su dispositivo cuando se llama a la API de VPS . Un mapa puede considerarse como una función que toma una imagen de consulta como entrada y devuelve posición y orientación (pose) como salida. El mapa que corresponde a un lugar determinado se crea a partir de las exploraciones que se cargaron en ese lugar. Los mapas VPS no son legibles.
¿Qué es una malla?
En lenguaje VPS, una malla es un modelo 3D de un lugar u objeto del mundo real. Las mallas proporcionan una representación detallada de un espacio físico u objeto, y son útiles para comprender cómo es un lugar , como referencia para la creación de contenidos de realidad aumentada, y para crear efectos de física y oclusión. Al igual que los mapas de , las mallas que corresponden a un lugar determinado se crean a partir de las exploraciones que se cargaron en ese lugar. Las mallas son legibles tanto por humanos como por máquinas.
¿Dónde puedo utilizar VPS?
VPS está disponible en más de 150.000 lugares del mundo real, y cada día se añaden más lugares. En para que una ubicación esté disponible en VPS, debe cargarse una cantidad suficiente de datos de escaneado AR en esa ubicación y debe completarse el proceso de activación de VPS. Los desarrolladores pueden añadir nuevas ubicaciones a el mapa y solicitar la activación de VPS de ubicaciones totalmente escaneadas mediante el navegador geoespacial.
¿Cómo funciona la activación del VPS?
Para que una ubicación pueda optar a la activación del VPS, debe tener cargados al menos 10 escaneos que superen los controles de calidad mínimos de , y la diferencia de tiempo entre el escaneo más antiguo y el más reciente en la ubicación debe ser de al menos 5 horas. Estos requisitos garantizan que los mapas y mallas resultantes sean de calidad suficiente y capturen variaciones suficientes para que los usuarios puedan localizarlos con fiabilidad. El proceso de activación de VPS se ejecuta en la infraestructura de mapeado de RA de Niantic e implica muchos pasos complejos . Del conjunto de exploraciones elegibles en la ubicación, un algoritmo selecciona la mayoría de las exploraciones para utilizarlas para construir mapas y mallas, y el puñado restante para validarlas y medir la calidad de la localización . El proceso de activación de una ubicación se ejecuta en los servidores de Niantic y normalmente tarda entre 1 y 2 horas en completarse.
¿Puedo encontrar mis escaneos una vez realizada la activación del VPS?
Durante el proceso de activación, los mapas y mallas creados a partir de las exploraciones cargadas se fusionan para incorporar la mayor cantidad de información posible. El producto final, que es utilizado por los desarrolladores para crear contenidos y por los usuarios para localizarlos, consiste en escaneos de muchas fuentes diferentes de . Los datos de escaneado se mezclan para crear una representación más completa del lugar, por lo que no existe una relación unívoca entre los escaneados que se cargan en un lugar y los mapas y mallas que se crean una vez que se activa el VPS.
¿Puedo añadir más exploraciones a una ubicación que ya está activada?
En algunos casos, es posible que los desarrolladores deseen añadir exploraciones adicionales a un lugar previamente activado en para mejorar la calidad y la cobertura de los mapas y mallas del lugar. En para que una Ubicación pueda ser "reactivada", debe haber tenido al menos 5 escaneos adicionales cargados desde la última vez que fue activada. Cabe destacar que aún no es posible añadir nuevas exploraciones a un mapa fusionado existente, sino que el proceso de reactivación requiere la construcción de un nuevo mapa fusionado que incorpore las nuevas exploraciones en el contexto de las ya existentes.
¿Cómo solicito la activación del VPS de una nueva ubicación?
Una vez que una ubicación tiene suficientes escaneos cargados para cumplir los requisitos de activación del VPS (al menos 10 escaneos totales en con al menos 5 horas de diferencia entre el escaneo más antiguo y el más reciente), los desarrolladores pueden solicitar la activación del VPS seleccionando la ubicación en la aplicación Wayfarer o en el navegador geoespacial y pulsando el botón "activar". Esto añadirá la ubicación a la cola de activación. Normalmente, una solicitud de activación de se completa en 2 horas. Los promotores también tienen la opción de solicitar a la reactivación de una ubicación existente una vez que se hayan cargado 5 escaneos adicionales.
¿Funciona el VPS de noche o con mal tiempo?
El VPS funciona mejor cuando hay buena visibilidad. Para maximizar las probabilidades de éxito de las experiencias con VPS, lo mejor es cargar muchas exploraciones de RA que cubran una amplia gama de condiciones diferentes de (por ejemplo, diferentes horas del día, diferentes condiciones meteorológicas, etc.). Por ejemplo, si está construyendo una experiencia en un lugar en el que llueve mucho, contar con algunos escaneos de un día lluvioso es muy útil.
¿Necesitan el escaneado AR y el VPS teléfonos con sensores LiDAR?
El escaneado AR y el VPS no requieren LiDAR.