Développer les expériences VPS
Activation de Lightship VPS
Pour activer le VPS dans votre projet WebAR, vous devez mettre enableVPS à vrai.
Pour les projets A-Frame, définissez enableVps: vrai sur le composant xrweb sur le site <a-scene>
Pour les projets non-AFrame, définissez enableVps: vrai dans l'appel à XR8.XrController.configure() avant
le démarrage.
Exemple - AFrame
<a-scene
  coaching-overlay
  landing-page
  xrextras-loading
  xrextras-runtime-error
  ...
  xrweb="enableVps: true;">
Exemple - Sans cadre
XR8.XrController.configure({enableVps: true})
// Ensuite, démarrez 8th Wall
Développer des expériences VPS sur mesure
Les scènes VPS sur mesure sont conçues pour un lieu unique et utilisent un maillage de référence du navigateur géospatial pour aligner le contenu AR.
Partie 1 : Ajouter un lieu à la scène
- Ouvrir le navigateur géospatial (icône de carte 🗺 à gauche)
- Trouvez un lieu activé par le SPV (ou [nommez/activez le vôtre] (https://www.8thwall.com/docs/web/#scanning-wayspots)).
- Ajouter le lieu au projet
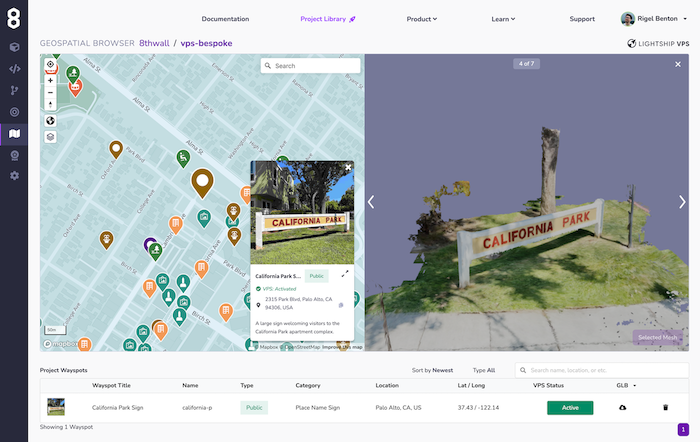
Partie 2 : Utiliser Location GLB comme référence pour une animation AR personnalisée
- Téléchargez la référence GLB à partir du côté droit de la ligne.
- Utilisez-le dans votre logiciel de modélisation 3D (Blender, Maya, A-Frame, etc.) pour positionner le contenu AR par rapport à l'origine du maillage.

IMPORTANT : L'origine de ce modèle 3D est l'origine de l'emplacement. NE RÉINITIALISEZ PAS L'ORIGINE OU VOTRE CONTENU NE SERA PAS ALIGNÉ.
FINALEMENT : Si le maillage téléchargé à partir du Geospatial Browser n'est pas d'une qualité suffisante pour être utilisé dans une animation cuite, un matériau physique ou un matériau d'occlusion, vous pouvez envisager de prendre un scan à l'aide d'une application tierce comme Scaniverse et d'aligner ce maillage de haute qualité avec celui téléchargé à partir de Geospatial Browser.
- Importer le GLB d'animation dans l'éditeur de nuages et l'ajouter à la scène
- Ajoutez le composant "named-location" au fichier "
" de votre ressource. L'attribut "name" fait référence au "nom" de l'emplacement du projet dans le navigateur géospatial.
Ta-da ! 🪄 Votre animation doit être alignée sur l'emplacement dans le monde réel.
Partie 3 : Ajout de l'occlusion et des ombres
- Dans votre scène, ajoutez
<a-entity named-location="name: LOCATIONNAME"><a-entity> - Ajoutez trois
<a-entity>à l'intérieur de cet élément en tant qu'enfants. Il s'agit de la maille de l'occluder, de la maille de l'ombre et de l'animation du VPS. - Dans le premier
<a-entity>, ajoutezxrextras-hider-materialetgltf-model="#vps-mesh". "#vps-mesh" doit renvoyer à une version de votre BGL de référence dont les textures ont été supprimées et la géométrie décimée. - Dans le second
<a-entity>, ajoutezshadow-shader,gltf-model="#vps-mesh", etshadow="cast : false". Le shader d'ombre applique un matériau d'ombre au maillage de référence avec un décalage de polygone pour éviter la lutte contre les Z. Vous pouvez choisir si vous voulez que le vps-mesh projette une ombre sur le monde réel avecshadow="cast : true". - Dans le troisième
<a-entity>, ajoutezgltf-model="#vps-anim",reflections="type : realtime",play-vps-animationetshadow="receive:false".play-vps-animationattend que levps-coaching-overlayait disparu avant de jouer l'animation VPS.
Développement à distance

Il est souvent utile d'utiliser l'inspecteur A-Frame pour positionner du contenu à distance sur votre bureau. Pour configurer la scène de ce projet pour le développement du bureau à distance, désactivez les composants suivants en ajoutant une lettre au début (c'est-à-dire "Znamed-location") :
xrweb->Zxrwebxrextras-loading->Zxrextras-loadinglocalisation nommée->localisation nomméexrextras-hider-material->Zxrextras-hider-material
Vous pouvez maintenant ouvrir le [A-Frame Inspector] (https://aframe.io/docs/1.3.0/introduction/visual-inspector-and-dev-tools.html) (Mac : ctrl + opt + i, PC : ctrl + alt + i) et positionner le contenu par rapport au maillage VPS importé depuis le Geospatial Browser. N'oubliez pas qu'il s'agit d'un inspecteur. Vous devrez copier les valeurs de transformation dans votre code.
En option, vous pouvez temporairement repositionner le <a-entity named-location> au centre de la scène
pour accélérer l'itération. NOTE : réinitialisez <a-entity named-location> à position="0 0 0" pour vous assurer que le contenu de VPS
est aligné correctement.
*Développement mobile à distance

Il est souvent utile d'utiliser l'inspecteur A-Frame pour simuler un SPV à distance sur votre appareil mobile. Pour configurer la scène de ce projet pour le développement mobile à distance, désactivez les composants suivants en ajoutant une lettre au début (c'est-à-dire "Znamed-location") :
localisation nommée->localisation nomméexrextras-hider-material->Zxrextras-hider-material
Ensuite, vous devez désactiver le VPS et activer l'échelle absolue. Cela permet de s'assurer que le maillage de référence est correctement dimensionné pour une simulation précise :
xrweb="enableVps : false ; scale : absolute ;" .
Vous devriez temporairement repositionner le <a-entity named-location> au centre de la scène
pour accélérer l'itération. Essayez d'aligner la base de votre maillage de référence sur y="0" (le sol).
NOTE : Avant de déployer votre projet VPS, réinitialisez <a-entity named-location> à position="0 0 0"
pour vous assurer que le contenu du VPS est correctement aligné.
Développer des expériences procédurales pour le SPV
Les scènes procédurales du SPV sont conçues pour utiliser n'importe quel emplacement détecté (par opposition aux emplacements de projet spécifiques). Une fois détecté, le maillage de l'emplacement est à votre disposition pour créer des expériences VPS générées de manière procédurale.
Deux événements liés à la procédure sont émis par le moteur de 8th Wall :
- xrmeshfound : émis lorsqu'un maillage est trouvé pour la première fois, soit après le démarrage, soit après un recentrage().
- xrmeshlost : émis lors de l'appel de recenter().
Une fois qu'un maillage est détecté, le moteur 8th Wall continue de suivre ce maillage jusqu'à ce que la fonction recenter() soit appelée.