HTML
Exporting an HTML5 Bundle
If you are looking for publishing from the offline desktop app, see Offline Publishing
At the moment, AR experiences are not yet provided via HTML5 export. Your project must use 3D cameras in order to function properly.
-
HTML5 export is currently only available for paid accounts. Please review the Account Settings information for more details.
-
Open your Studio project.
-
Click Publish. Under the Export section, select HTML5.
-
Select an environment to build your bundle from.
-
Click Build to generate your HTML5 bundle.
Once the build is complete, download the
.zipfile using the download links provided in the build summary.
Publishing your 8th Wall project to gaming platforms
Since 8th Wall HTML5 bundles are fully contained builds, they can be self hosted or published to many gaming platforms.
Self-Host
The HTML5 bundle can be self hosted or deployed in many different ways. The instructions below is just one example using npm.
For more comprehensive information on self hosting, check out this guide.
- Download the
.zipbundle, then unzip the file. - If you do not already have
npminstalled, follow the instructions on this page to set it up. - Run
npm install --global http-serverto install the http-server npm package as a global CLI tool. - Run
http-server <path_to_unzipped_folder>- Example:
http-server /Users/John/Downloads/my-project
- Example:
- There should be some logs that list a series of local URLs like:
Available on:
  http://127.0.0.1:8080
  http://192.168.20.43:8080
  http://172.29.29.159:8080
- Open one of the URLs in your web browser.
Itch.io
- Download the
.zipbundle. - Log in to Itch.io and create a new project.
- Fill in the project details:
- Under Kind of project, select HTML.
- Under Uploads, select Upload files. Upload the
.zipfile that you downloaded in Step 1. Check the This file will be played in the browser checkbox. - Under Embed options, choose the appropriate sizing for your project.
- Finish configuring your game and publish it.
Viverse
- Sign in to Viverse and go to Viverse Studio.
- Under Upload Your Own Build, click Upload.
- Click Create New World.
- Enter the Name and Description for your project, then click Create.
- Click Content Versions.
- Under New Version, click Select File. Upload the
.zipfile that you downloaded in Step 1, then click Upload. - Under iframe Support for Preview, click Apply iframe Settings and enable all permissions that your project requires.
- Note that Viverse will put your project downloaded from 8th Wall in it's own iFrame, and the Viverse iFrame will need to grant a permission which your project requires.
- Finish configuring your game and publish it.
Game Jolt
- Sign in to Game Jolt and go to Game Jolt Store.
- Click Add Your Game.
- Enter the project details and click Save & Next.
- On your game dashboard, under Packages, click Add Package.
- Under Edit package, click New Release.
- Click Upload Browser Build. Upload the
.zipfile that you downloaded in Step 1. - Configure your game dimensions, or select Fit to screen? if you want the game to fit the screen.
- Finish configuring your game and publish it.
GamePix
GamePix does not allow games with external links. Make sure your project does NOT make network calls outside of the bundle.
- Download the Full HTML embed code.\
- Sign up for a GamePix Developer Account and go to the GamePix Dashboard.
- Click Create New Game.
- Enter the game details and click Create.
- Under Info, select HTML5-JS under Game Engine.
- Under Build, click Browse File. Upload the
.zipfile you downloaded earlier. - Finish configuring your game and publish it.
Newgrounds
- Download the Full HTML embed code. Make a
.zipfile of thisindex.htmlfile. - Sign up for a Newgrounds account.
- Click the arrow in the top right corner and select Game (swf, HTML5)
- Under Submission File(s), click Upload File. Upload the
.zipfile you downloaded earlier. - Configure your game dimensions and check Touchscreen friendly
- Finish configuring your game and publish it.
Y8
- Download the Full HTML embed code. Make a
.zipfile of thisindex.htmlfile. - Log into Y8.
- Make sure you have verified your email, then create a free Y8 Storage Account.
- Under Game, choose Zip and then HTML5.
- Click Choose File. Upload the
.zipfile you downloaded earlier. If you have not created a Storage Account it will fail. If that happens, click Create Storage Account to create one, then refresh the Upload Your Content to Y8 page and try again. - Finish configuring your game and publish it.
Poki
- Go to the Poki Developer Portal.
- Fill in your project details, using the link to your hosted project under Link to your game.
- Click Share your game.
Kongregate
- Email the Kongregate team at bd@kongregate.com. Include the link to your hosted project in your email.
Armor Games
- Email the Armor Games team at mygame@armorgames.com. Include the link to your hosted project in your email.
Addicting Games
- Download the Full HTML embed code.
- Email the Addicting Games team at games@addictinggames.com. Include the
.zipfile in your email, as well as all of the other information they request in the Addicting Games Developer Center.
Lagged
- Email the Lagged team at contact@lagged.com. Include the link to your hosted project in your email.
- Once you are approved, you can sign up for a Lagged account using the Invite Code they provide you and upload your game.
Discord
Sample Project
As a starting point to use the Discord Embedded SDK with your project, you can try out our sample project.
- Navigate to https://www.8thwall.com/8thwall/discord-activity-example and clone the project to your workspace.
- Follow the steps in Exporting an HTML5 Bundle
- Download the
.zipto a location of your choosing.
Discord Developer Set Up
In order to run a web client in Discord, you'll need to set up an account and create an app in the developer hub.
-
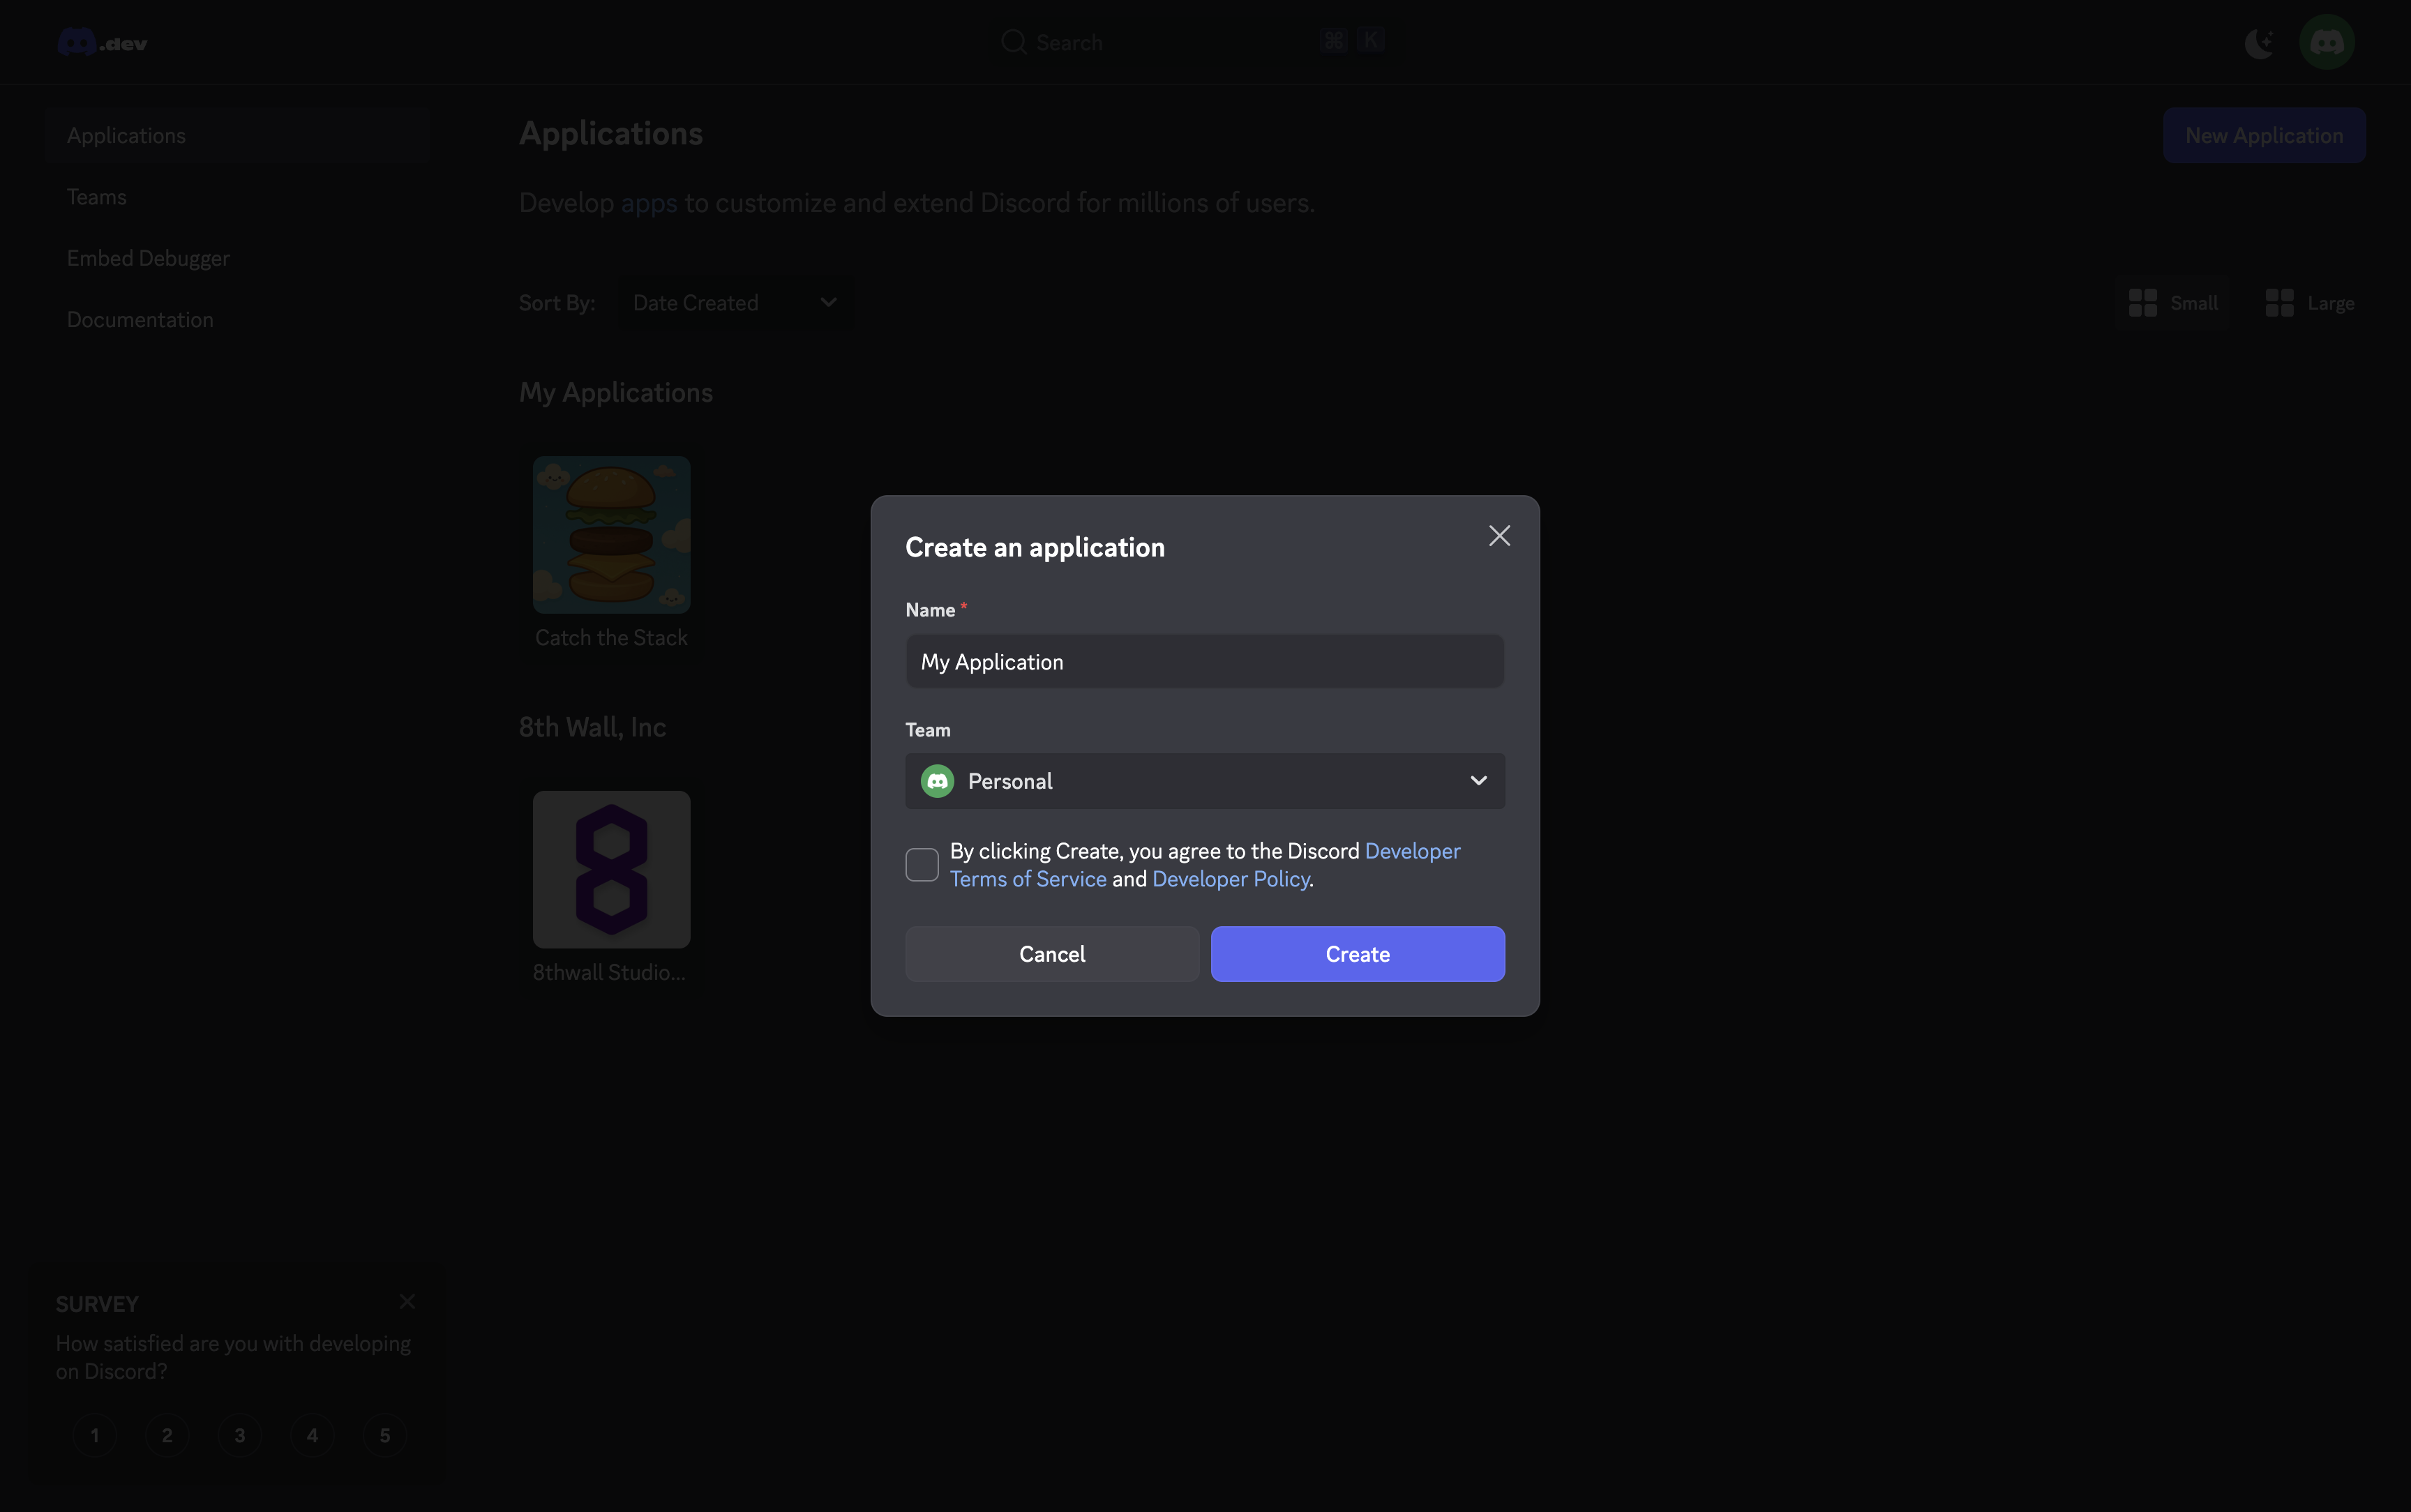
Create a Discord Account and navigate to https://discord.com/developers/applications
-
Create a new application by clicking the Button in the top right corner
- Enter a name for the application and accept the terms of service
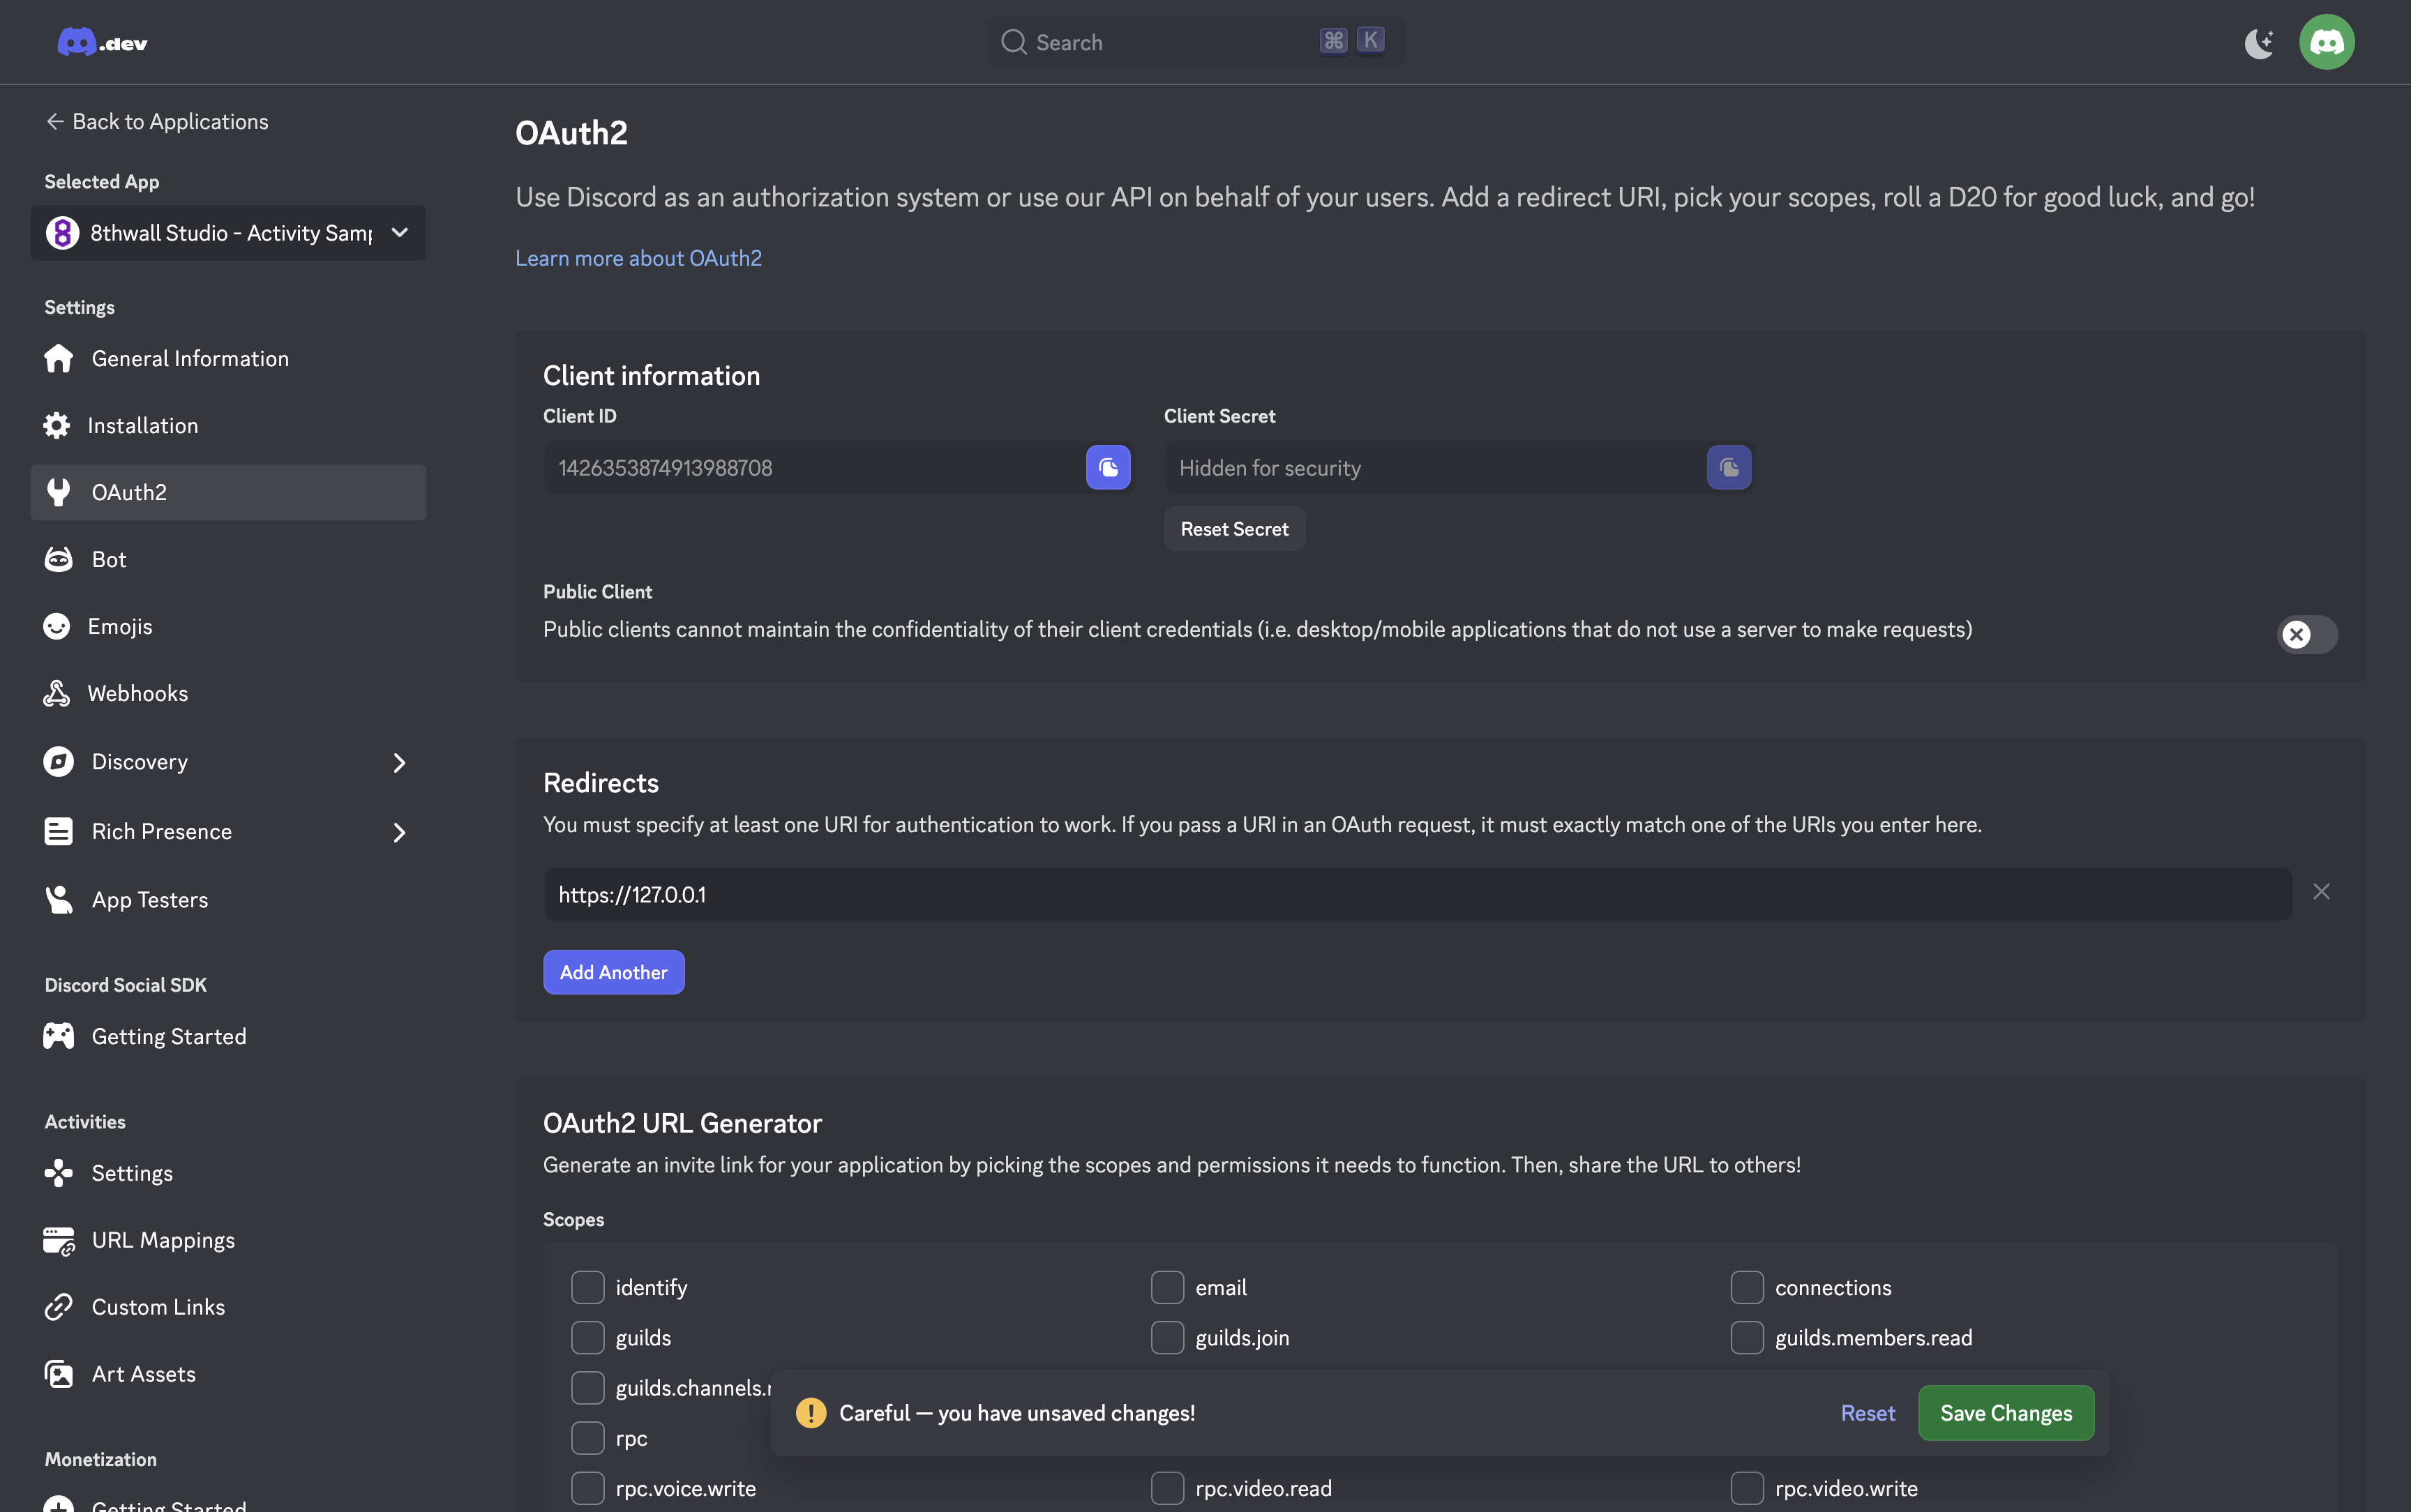
- Go to the OAuth2 page, under the Settings section:
- Add
http://127.0.0.1as a redirect URI for testing. - Save the
Client IDsomewhere secure. - Click "Reset Secret" to retrieve the
Client Secretand store it somewhere safe. - Press "Save" to keep your settings.
- Add
-
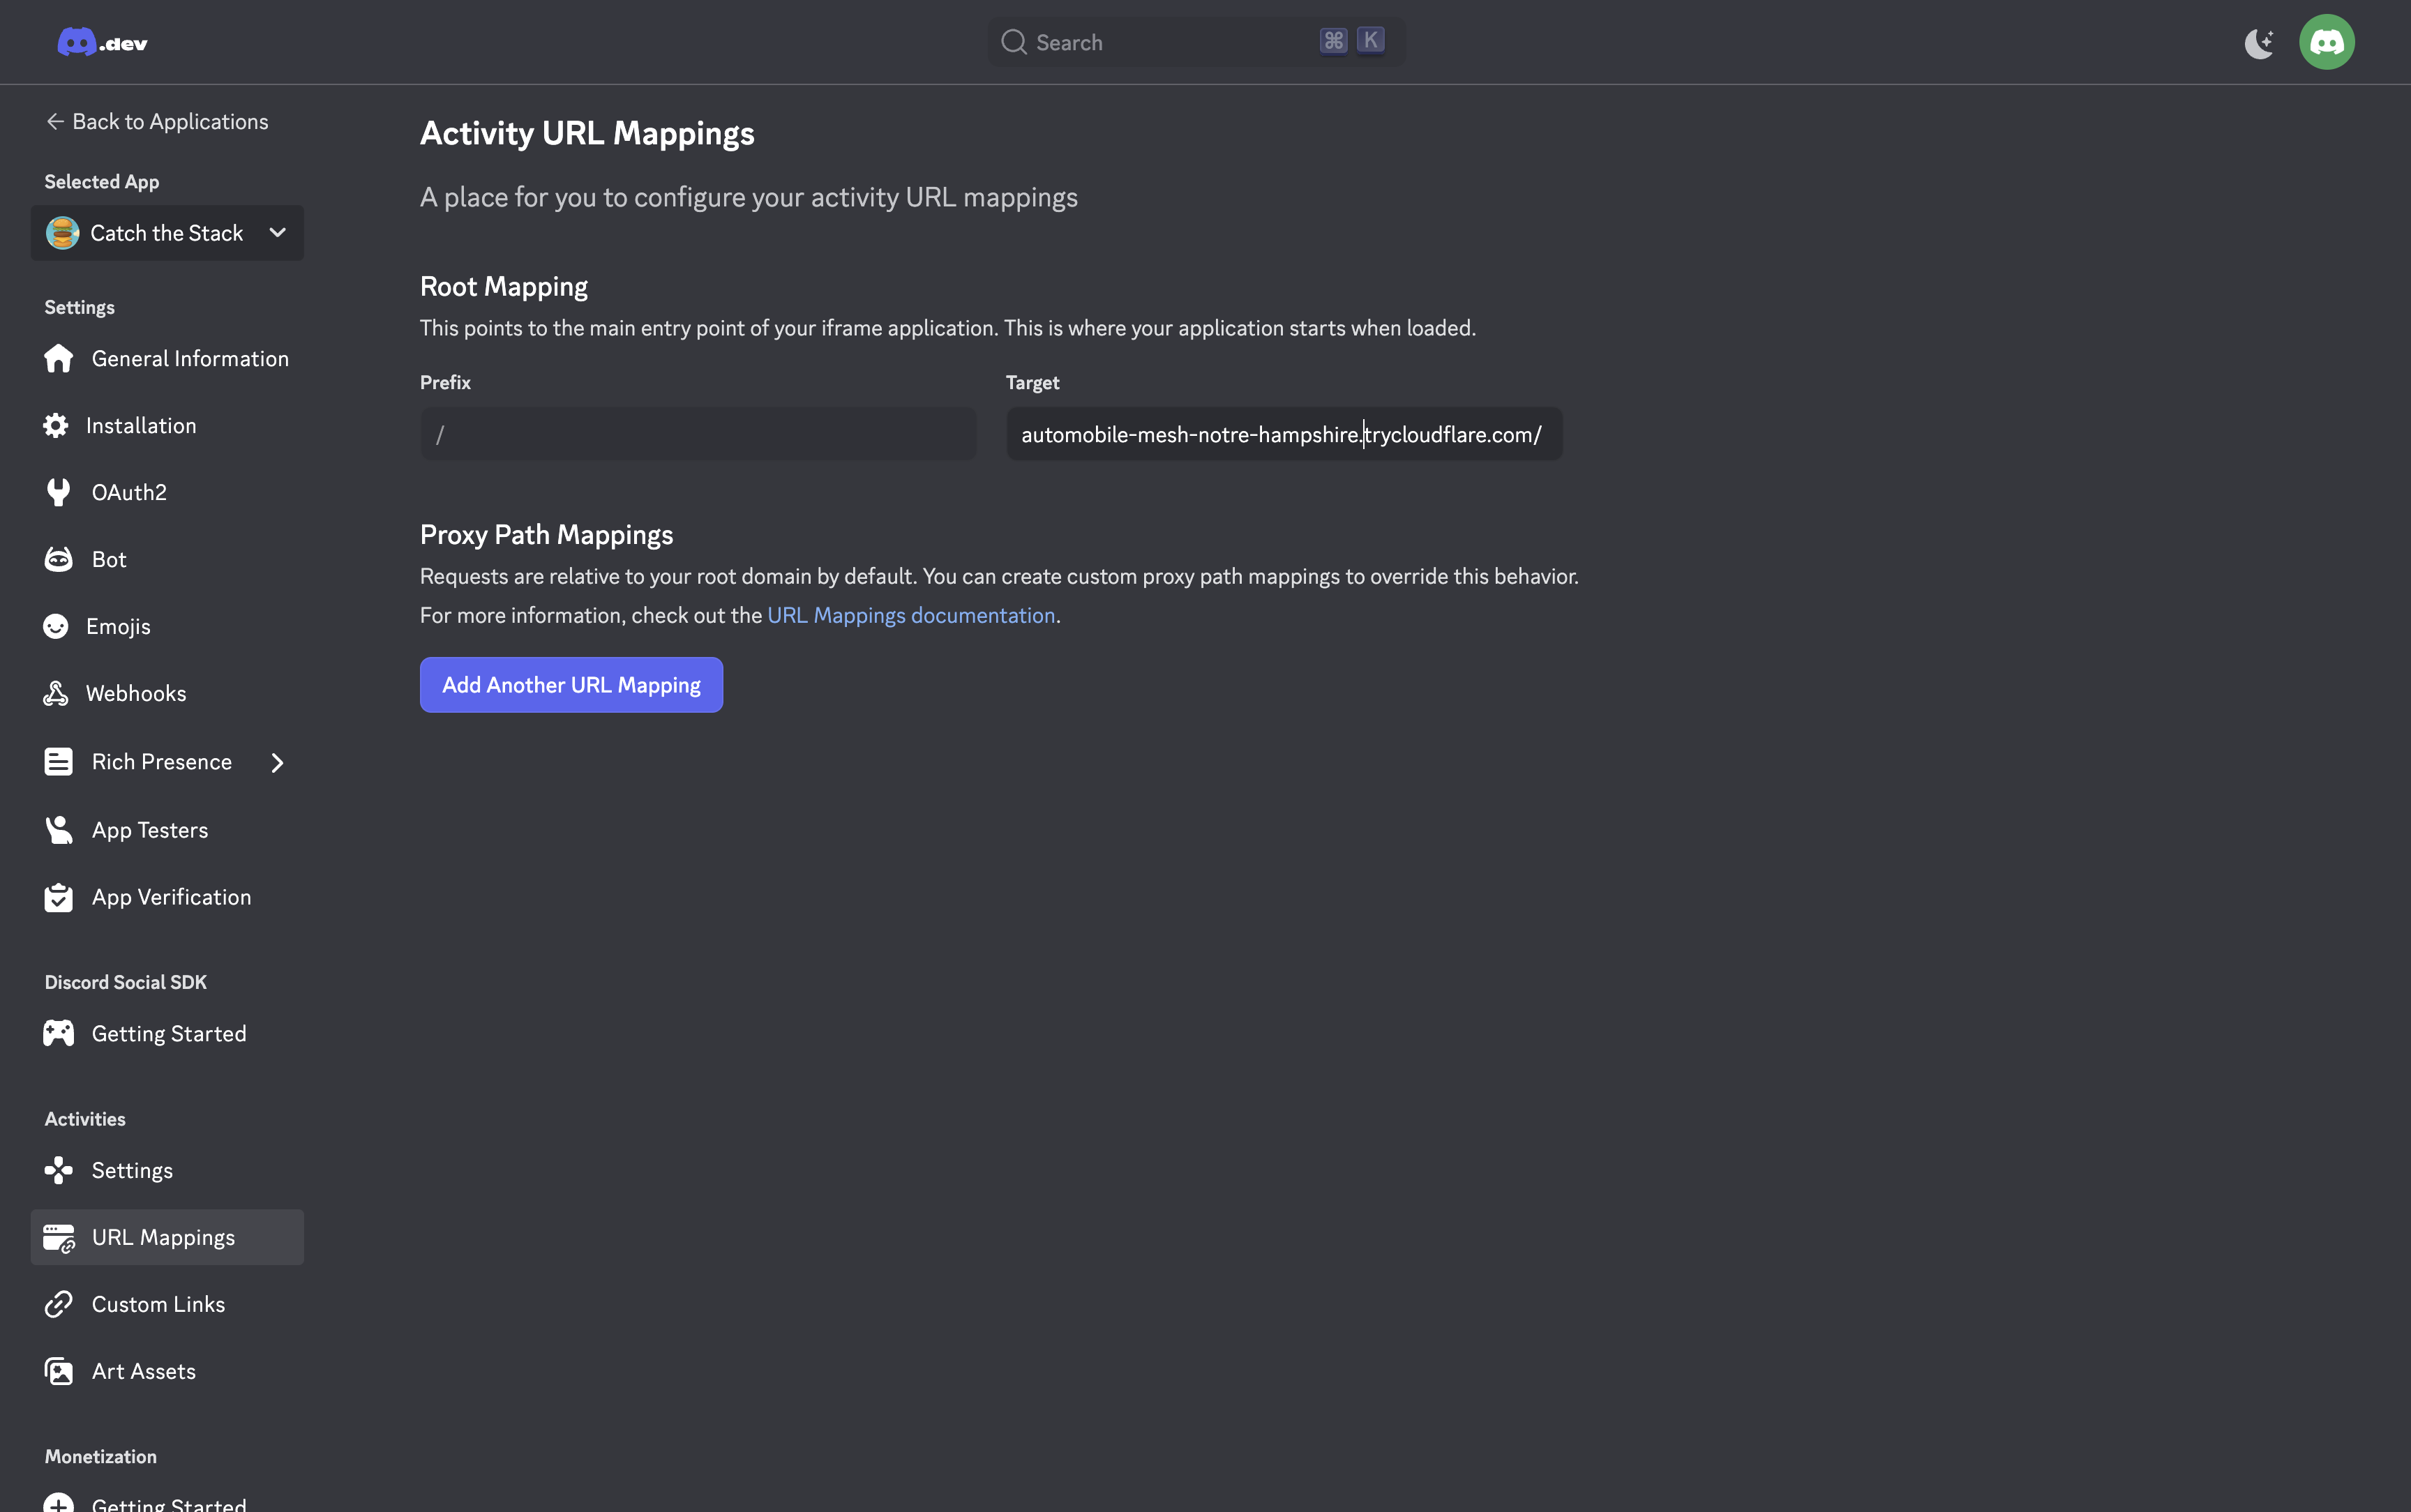
Navigate to the URL Mappings page, under the Activities section:
- Add a temporary target to the root mapping like
127.0.0.1:8888. This will be replaced later with your public URL, but it's required to enable Activities in the next step.
- Add a temporary target to the root mapping like
-
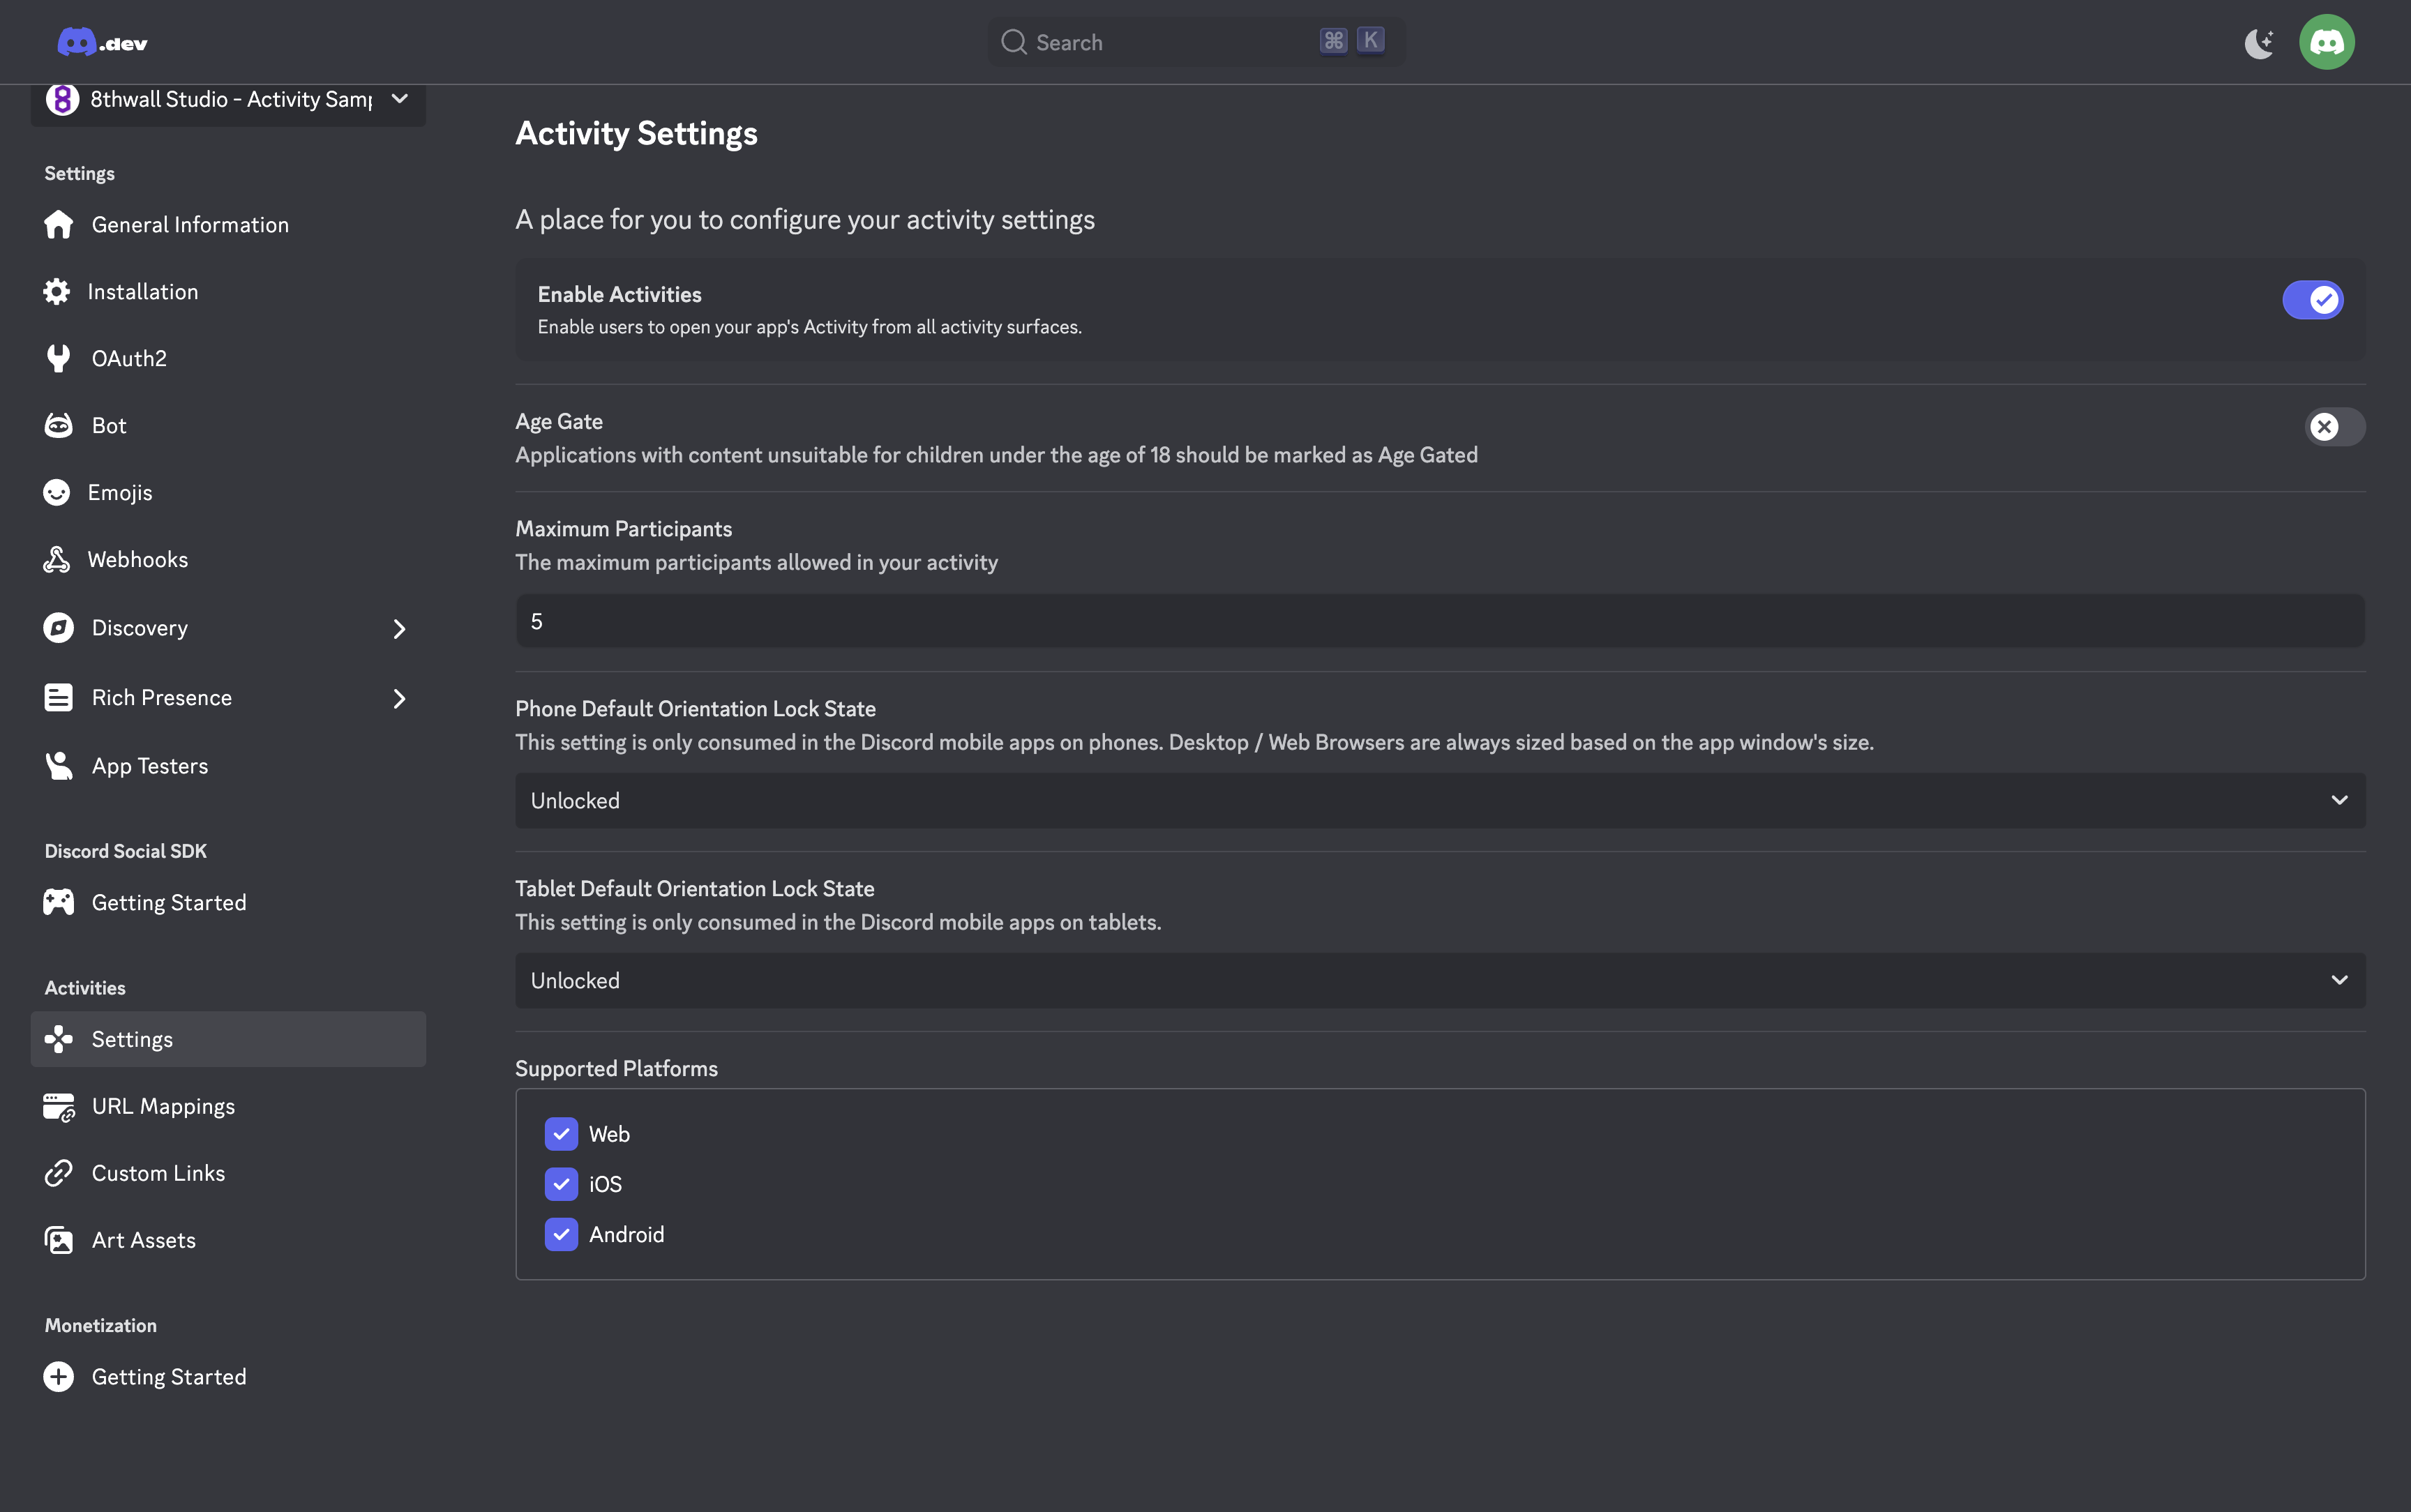
Go to the Settings page, under the Activities section:
- Toggle Enable Activities and accept the app launcher agreement.
- Then, go to the Installation tab, under the Settings section:
- Copy the link from the Install Link panel and open it in your browser.
- Install the application to make it accessible in any server or DM.
Launching an Application
-
Set up the example server code at https://github.com/8thwall/discord-activity-example
git clone https://github.com/8thwall/discord-activity-example- Run
npm install - Unzip the
.zipdownloaded earlier containing the frontend of the project. - Create a
.envfile in the root of the repo, and fill it out with the details from the Discord Developer Portal:
DISCORD_CLIENT_ID=XXXXXXXXXX
DISCORD_CLIENT_SECRET=XXXXXXXXXX
DISCORD_CLIENT_HOST_PATH=/path/to/unzipped/folder- Enter
npm startto start the server.
-
Use
cloudflaredto create a tunnel, so the project will be publicly accessible over the internet.brew install cloudflaredto download thecloudflaredCLI tool- Run
cloudflared tunnel --url http://localhost:8888. - Make note of the URL that was generated.
Example:
2025-10-11T03:05:16Z INF +--------------------------------------------------------------------------------------------+
2025-10-11T03:05:16Z INF |  Your quick Tunnel has been created! Visit it at (it may take some time to be reachable):  |
2025-10-11T03:05:16Z INF |  https://sporting-follow-audit-href.trycloudflare.com                                      |
2025-10-11T03:05:16Z INF +--------------------------------------------------------------------------------------------+- Open the
cloudflaredURL in your browser to make sure the project loads.
-
Update your Discord application settings:
- Open the Discord Developer Portal and navigate to your application
- Go to URL Mappings under the Activities section
- Replace the temporary target with your
cloudflaredURL for the Root Mapping
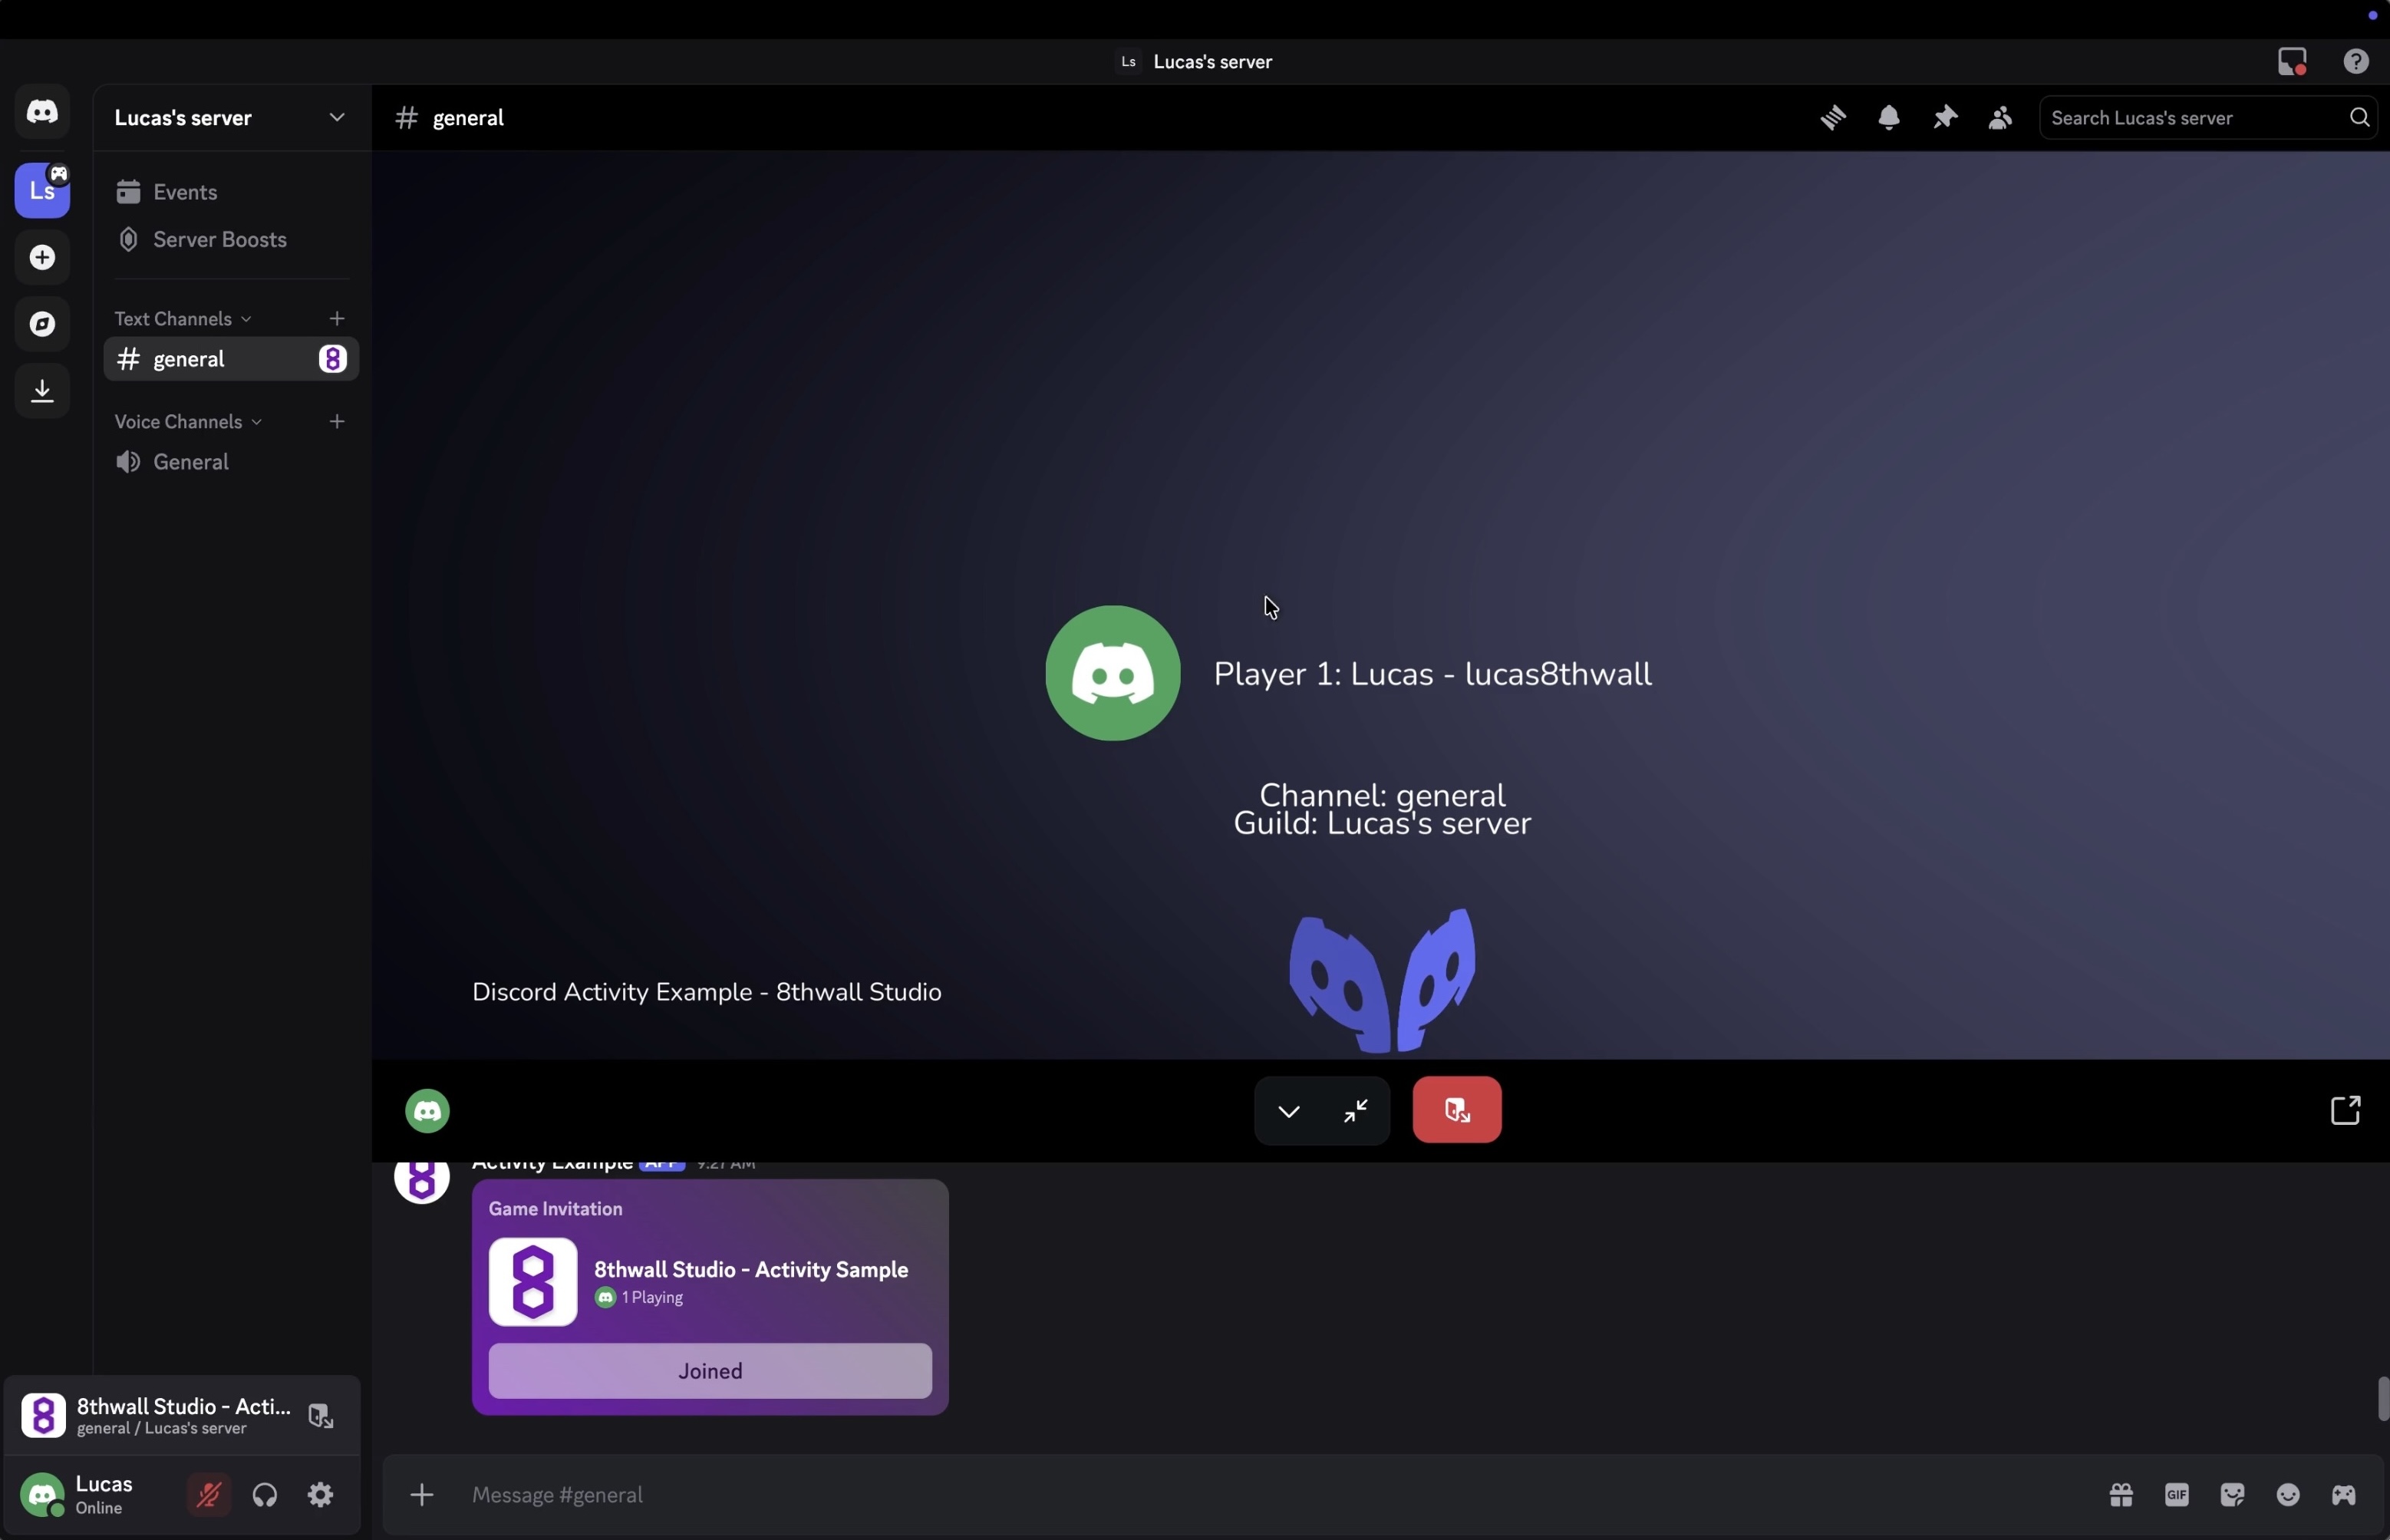
- Test your Discord Activity:
- Open Discord and navigate to any DM or server
- Click the activities icon (game controller) in the voice channel controls
- Find and click your application in the Apps & Commands panel