Doty Run
Doty Run is an endless runner game with dynamic gameplay, procedural generation, and innovative mechanics. Guided by the adventurous Doty, players navigate an icy trail filled with coins, obstacles, and sharp turns—all while chasing high scores. Doty Run highlights the power of Niantic Studio to build complex, interactive web games.
Make it your own with the sample projects
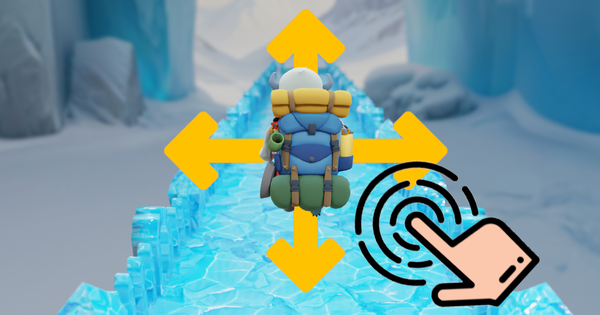
Player Controller
Learn how to implement a player controller that responds to input actions and touch gestures.
View sample project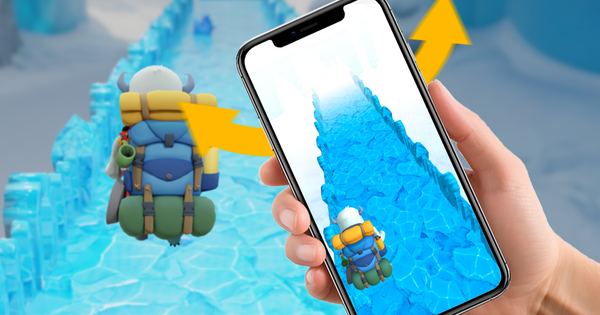
Gyroscope Controller
Master gyroscope-based tilt controls for intuitive and immersive gameplay.
View sample projectBehind the Build: Doty Run

Written by Camilo Medina
December 4, 2024
Introduction
Doty Run is an exciting endless running game in which players guide Doty, an intrepid adventurer who travels an ice-cold path to collect the precious Doty Coins. The goal? Survive as long as you can, go as far as possible, and gather as many coins as you can to beat your high score.
Control Doty by tilting your phone left or right to move sideways, and swipe up, down, left, or right to jump, roll, or turn. For PC players, movement is controlled using the arrow keys. Navigate the ice path, avoid obstacles, and follow the trail to keep the adventure goin. Every run saves your best score—each adventure is a chance
to beat it! How far can you go?
Project Structure
3D Scene
- GameManager: Contains the
game-managerscript responsible for core game state and score. - GameUI: Contains the Entities responsible for the UI
- Start: Contains the
ui-startscript - Gameplay: Contains the
ui-gameplayscript - GameOver: Contains the
ui-game-overscript
- Start: Contains the
- Environment: 3D models of the game environment
- Fog: Contains the
fog-controllerscript for managing fog effects in the scene - Sfx: Contains the audio component for background music and the
sfx-managerscript for sound effects - PathRoot: This is the root parent of the path elements generated during runtime, contains the
path-movementscript - PathPool: Contains the
path-managerandobject-spawnerscripts to dynamically create and spawn path objects from available child elements during gameplay- Base: Base tile 3D model where the player can move across three positions: left, center, and right. Contains a mesh and a physics collider
- Partial: Partial tile 3D model where the player can move to only one position (left, center, or right). Contains a mesh and a physics collider.
- Corner: Corner tile 3D model where the path changes direction. Contains a mesh and a physics collider
- Arc: Arc-shaped obstacle 3D model. Contains a mesh and a physics collider
- SmallObstacle: Small obstacle 3D model, conditionally active. Contains a mesh and a physics collider
- LargeObstacle: Large obstacle 3D model, conditionally active. Contains a mesh and a physics collider.
- Coin: Coin 3D model. Contains a mesh and a physics collider set to events only
- Player: Contains a physics collider and all player-related scripts:
player-controller,player-collision,input-manager,gyro-controller,player-animator, andtouch-input-controller - Doty: 3D model of Doty, contains a mesh and animations for all player actions.
- Camera: Contains game camera
- Ambient Light: Contains game ambient light
- Directional Light: Contains game directional light
Assets
3D Models
- Environment
- env-1.glb: A 3D model of the main environment
- Objects
- coin_1.glb: A 3D model of a coin, used as a collectible.
- doty_coin_gold_v2.glb: Alternate version of the coin model.
- ice_large.glb: A large ice obstacle 3D model.
- ice_small.glb: A small ice obstacle 3D model.
- Path
- arc.glb: A 3D model of an arch structure.
- base_v1.glb: A 3D model of the base tile.
- base_v2.glb: Alternate 3D model of the base tile.
- corner.glb: A 3D model of the corner tile.
- partial.glb: A 3D model of the base partial tile.
Player
- doty_opti_web_anim.glb: A highly optimized 3D model of the player character, with animations designed for web performance.
Sound Effects (SFX)
- coin.mp3: Sound effect played when a coin is collected.
- Fast_Lane_Fun.mp3: Background music for fast-paced gameplay sequences.
UI
- Game Over
- game_over_background.jpg: Background image displayed on the game-over screen.
- restart_button.png: Button image used to restart the game.
- Gameplay
- coin_icon.png: coin icon for UI.
- Start
- start_background.jpg: Background image displayed on the start screen.
- start_button.png: Button image used to start the game.
Scripts
This is a quick overview of the scripts in this project.
app.js: This .js file serves as the main entry point for the web application and can be used to implement core functionality. Here, it imports global and modular CSS styles (utilities.css, start.css, gameplay.css, and game-over.css) to define the visual appearance and layout of the game UI. Additionally, it injects the font to be used by the UI for consistent styling.
game-manager.ts: Manages the core game states (start, gameplay, gameover), handles player score calculations, and manages saving and retrieving
the high score.
utilities.js: Implements core mechanics that require access to the THREE library, such as the function to request gyroscope access. These utilities are kept separate from Studio scripts to maintain organization and avoid conflicts with the ECS library.
Camera
camera-follow-player.ts: Implements a simple third-person camera system. In the schema it requires a reference to the player. The camera tracks the player's position and rotation, following the rotation and position along the Y-axis.
This mechanic is achieved by creating an empty entity that follows the player, and then making the camera a child of this entity. The camera is positioned at its current position creating an offset relative to the player. This approach avoids the need to compute transformation matrices to adjust the camera's position relative to the player dynamically.
The script can be extended to follow the player along the X-axis as well. For gameplay reasons, this feature is not activated, but it can be enabled by uncommenting the relevant section of the code.
CSS
game-over.css: Handles the UI styles for the game over screen. This includes the appearance of the game over background, the score table, and the restart button.
gameplay.css: Defines the UI styles for the gameplay status. It includes static and dynamic indicators displayed from left to right: coin quantity, distance, and points.
start.css: Manages the UI styles for the start screen. It defines the appearance of the start background and the start button.
utilities.css: Provides utility classes for UI elements, such as classes for hiding elements and adding animations.
Inputs
gyro-controller.ts: This component implements input mechanics using the phone's gyroscope to detect rotation around the Y-axis (left-right tilt) based on a configurable schema property, angleLimit. Accessing the gyroscope on some devices requires explicit user permission, which must be requested through direct user interaction, such as pressing a button. The component can be easily modified to detect other types of rotation, such as rotation around the Z-axis (compass direction) or the X-axis (front-back tilt).
input-manager.ts: This component manages the implementation of the Studio input system. Currently, Studio only provides the ability to check if an input is active using input.getAction(), without offering information on when the input is triggered or ends. This script implements its own system, dispatching events for both cases on-input-action-triggered and on-input-action-ended.
touch-input-controller.ts: This component manages touch interactions on the screen, triggering the on-input-action-triggered event when a finger swipes up, down, left, or right across the screen.
Path Builder
fog-controller.ts: This component configures and applies a fog effect to the Studio scene by accessing the three.js scene through world.three.scene. The schema allows customization of the fog's color (using RGB values), as well as its near and far distances.
object-spawner.ts: This component positions objects on tiles in a new section of the path based on a procedurally generated configuration. The configuration determines which objects—such as coins, obstacles, or power-ups—are placed on each tile.
path-manager.ts: This component manages a core mechanic of the game: dynamically generating new path sections. It places tiles based on a procedurally generated configuration, determining the section's length, direction, and partial tile positioning.
path-movement.ts: This component moves in forward direction the current
tiles in the path section, creating the illusion of player movement through the
game scene.
Player
player-animator.ts: Controls the player's animations by responding to in-game events like jumping, rolling, falling, and collisions. It transitions between animations such as Idle, Run, Jump, and Fall based on player actions or game events. The component also handles timing for specific animations, like switching back to Run after a roll or pausing animations during game over. It also checks for collisions with the arc obstacle in a simple and straightforward way: by verifying if the current animation is Roll. This approach ensures that the player pressed the down button at the correct time without overcomplicating the code.
player-collision.ts: Handles all player collisions. The game implements two main types of collisions: one for tiles and another for objects. It dispatches events corresponding to each collision to trigger actions in other scripts. Since Studio currently does not have a tagging or entity naming system, collision filtering is performed using the objectThree name, which can be get or set through world.three.entityToObject.get(entity). Be aware that this approach may cause weird behavior when testing the game in Live Preview.
player-controller.ts: Manages player movement, including jumping, rolling, and turning, based on input events from gyro-controller.ts, input-manager.ts, and touch-input-controller.ts. It triggers corresponding animations via player-animator.ts and checks for game-over conditions, such as falling or colliding with obstacles, dispatching the on-player-lost-game event when necessary. Additionally, it adapts to the input method: on desktops or devices without a gyroscope, it allows sideways movement via keyboard or swipe gestures respectively .
SFX
sfx-manager.ts: Controls background music playback, triggering audio when the start event begins gameplay.
UI
ui-game-over.ts: Creates individual divs to contain each element of the game overUI screen, including the background, restart button, and the panel displaying the game score. It also manages the event triggered when the restart button is pressed.
ui-gameplay.ts: Creates individual divs to contain each element of the gameplay UI screen, representing the three game stats: coins, distance, and points. It tracks the player's run distance and the game's score during gameplay.
ui-start.ts: Creates individual divs to contain each element of the game start UI screen, including the background, and start button. It also manages the event triggered when the start button is pressed.
Implementation
While developing an endless running game, there is a particular detail to keep in mind: the player character doesn’t move; it’s the path that has to move towards the player, creating the illusion that the player is always moving in the forward direction.

Why?
As the game doesn’t know how far the player might go, moving too far from the global origin could lead to errors in mathematical calculations due to floating-point precision limitations. Additionally, keeping the player stationary at position (0,0,0) simplifies the development of certain gameplay mechanics, such as collision detection and camera movement.
So, which does what?
- Player: Moves only along the X and Y axes, performing actions such as jumping,
rolling, moving sideways, and rotating around the Y axis when turning. - Path: Moves along the Z axis towards the player, creating the illusion of forward
movement.
UI
Every game requires a UI, and Studio provides a built-in UI system. However, since this game is designed to run in a web browser, Studio's UI can be enhanced using CSS, allowing for more stylish designs and greater customization.
Here's a simple workflow for implementing a UI with TypeScript and CSS in Studio:
- Create an ECS Component: e.g.,
my-component.ts - Add the Component to a Scene Entity: Attach the custom component to an entity in your scene.
- Instantiate the UI Element: Create a new
divelement and assign it a unique ID. Example:const myUiElement = document.createElement('div') myUiElement.id = 'my-ui-element' - Append the UI Element to the Document: Add the element to the document body. e.g.,
document.body.append(myUiElement) - Create a CSS File: e.g.,
my-css-style.css - Define Styles for the New UI Element: Use the unique ID to target the element in your CSS file. e.g.,
#my-ui-element {/_ Add styles here _/} - Import the CSS File into the Application: Import the newly created CSS file in your app.js. e.g.,
import './my-css-style.css'
Hint: The app.js file must be created manually; it is not included by default in a Studio project.
Et voilà! using this workflow, it is possible to implement any UI element.
This game features three different UI screens, each implemented following the steps above:
- Start Screen: Displays a background image, game title, and a start button to begin the game.
- Gameplay Screen: Provides real-time updates, such as scores and player status.
- Game Over Screen: Shows the final score and includes a restart button for replaying the game.

Since the game requires access to the gyroscope as input to control the player, pressing the start button triggers the requestGyroscopePermission function from the utilities.js script. This prompts the browser to request the necessary permissions from the user before gameplay begins.
Player Controller
The player-controller.ts script is designed to handle inputs from three separate scripts: gyro-controller.ts, input-manager.ts, and touch-input-controller.ts. Each script provides specific input data that the player controller uses to move or animate the player character.

The gyro-controller.ts script dispatches the on-device-orientation-changed event, including the deviceOrientationState as its data. This state represents the device's orientation (left, center, or right). The player-controller.ts listens for this event and calls the movePlayerSideways(side) function, adjusting the player's position accordingly.
Both input-manager.ts and touch-input-controller.ts dispatch the on-input-action-triggered event, with actionName as the data. This represents the triggered action (up, left, right, or down). The player-controller.ts listens for this event and calls rotateAndMovePlayer(actionName), which handles both rotation and movement based on the specified action.
For every action executed by the player, the player-controller.ts script dispatches the corresponding animation event to ensure the appropriate animation is triggered.
Path Builder
As mentioned, the player character doesn’t move; instead, the path moves toward the player, creating the illusion of forward movement. To achieve this, the game implements a path that consists of sections, and each section is made up of tiles. There are different types of tiles.

- Base Tile: The standard, complete tile. On a base tile, the player can move sideways between three positions: left, center, and right.
- Partial Tile: A thin tile, covering only one-third of the base tile's width. Here, the player can only move in one sideways position.
- Corner Tile: Indicates a change in the path's direction and marks the beginning of a new section. Every corner tile transitions into a new path section. In this tile the player is allowed to turn to continue in the path direction.
When the game starts and when placing the corner, path-manager.ts compute a new section's configuration using the computeNewSectionPathConfig(includeCornerTile, includePartialTile) function.

// TODO: convert image to code
This function generates an array of strings representing the sequence of tiles in the section.
For example:
['tile-base', 'tile-partial', 'tile-partial', 'tile-partial', 'tile-partial', 'tile-base', 'tile-base', 'tile-base', 'tile-base', 'tile-base', 'tile-corner']
Each string describes the type of tile to spawn in the section. By passing false to the includeCorner or includeVariants parameters, the game can exclude corner or partial tiles as needed.
The path-manager.ts listens for the on-tile-changed event dispatched by the player-collision.ts script. This event triggers whenever the player collides with a new tile. The callback function handleTileChange(event) manages this event by removing the previous tile and adding a new one to continuously maintain the path.
When a new tile is added to the section, it is attached as a child of the PathRoot entity. The path-movement.ts script moves all child tiles forward to the direction of the player, creating the illusion that the player is always moving in the forward direction.

// TODO: convert image to code
Object placement, such as coins, obstacles, or power-ups, follows a similar process to tile placement. The object-spawner.ts script uses the computeObjectConfigInSectionTiles(addCoins, addObstacles, addPowerUps) function to generate configurations for objects in the new section.
This function is triggered by the on-new-path-section-computed event dispatched by the path-manager.ts.
For example { 0: [], 1: [], 2: ['obstacle'], 3: ['coin', 'obstacle'], 4: ['powerUp'], 5: [], 6: ['corner'] }
Each key corresponds to a tile index, and the value is an array of objects to be placed on that tile. This system is designed to be flexible and extendable, allowing for the addition of new object types.
To improve gameplay aesthetics, a fog effect is implemented in Studio, giving the illusion to the player that the path is endless. This prevents the player from noticing how the tiles are added one by one.
Gameplay
During gameplay, the current number of coins collected is shown on the left side of the screen, while the right side displays the current points. Once the player reaches every 250 meters, a status update shows the current distance.

When the player loses, either by falling down or colliding with an obstacle, the game-manager.js script calculates the new score. If the new score is higher than the previous one, it saves and displays the new high score with a unique message; otherwise, it simply displays the score. Saving and retrieving data is achieved using these two functions.

// TODO: convert image to code