UFO Rodeo
They are coming for your cows, but you have a few tricks up your sleeve. Use your super-charged cattle prod to zap incoming UFOs and save your flock.

Make it your own with the sample projects
Studio: Score System
This project demonstrates a simple score tracking system using Niantic Studio.
View sample project
Studio: Roaming Entities
This project showcases how to make roaming entities in Niantic Studio.
View sample project
Studio: Spawning System
This project demonstrates how to dynamically spawn 3D entities using a custom component in Niantic Studio.
View sample projectBehind the Build: UFO Rodeo

Written by UFO Rodeo Team
March 26, 2025
Introduction
Farmer Joe Zamora has long seen strange lights in the sky at his New Mexico cattle Ranch, but now they are coming for his cows.
Fortunately, their high-tech UFOs don't match his country's ingenuity.
Use your super-charged cattle prod to zap incoming UFOs out of the sky while they try to beam up your cattle. Take out as many as you can before losing all of your cows.
UFO Rodeo has a lot of pieces that make it run. As such we have broken it down into three main sample projects to demonstrate how it operates. Feel free to clone the code base of both the complete UFO Rodeo and its accompanying features to learn more.
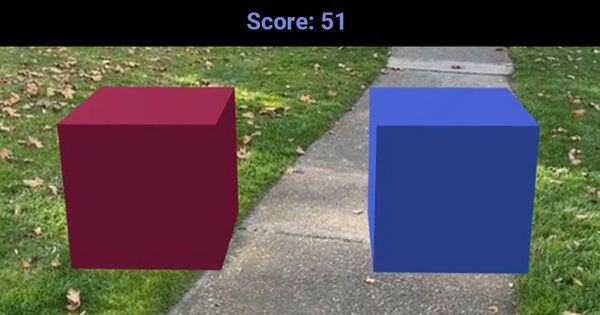
Score Counter Sample Project
This project demonstrates a simple Score Counter system using Niantic Studio. You’ll learn how to:
- Increment or decrement a score when tapping on different entities.
- Display and update the score on a UI element in real time.
- Trigger simple particle effects when the score changes.
Project Structure
Below is a brief overview of the key folders and files:
├── assets/ // Additional media assets (images, models, etc.)
├── counter.ts // Main script defining the Score Counter component
├── cleanup.ts // Utility for cleaning up event listeners
└── README.md // This README file
Hierarchy Entities Overview
- counter
- An entity that has the component added.
- Configures references to the increment entity, decrement entity, and UI score entity.
- Increment Entity
- A 3D object (e.g., the purple cube) that increments the score when tapped.
- Decrement Entity
- Another 3D object that decrements the score when tapped.
- Score UI Entity
- A text-based UI element or 3D text that displays the current score.
How It Works
- Counter Component
- Registered in . The ECS references three critical properties:
- tapped to increase the score.
- tapped to lower the score.
- the text or UI element showing the current score.
- Registered in . The ECS references three critical properties:
- Event Listeners
- The script uses events on the increment and decrement entities to adjust the score.
- Score Updates & UI
- Each time the score changes, the script calls , which updates the text on the screen.
- Particle Effects
- The function spawns a random particle burst on whichever entity was tapped, adding an extra bit of visual feedback.
- Cleanup
- When the component is removed, ensure that event listeners and references are cleared to avoid memory leaks
Getting Started
- Clone or Import This Project
- Clone this sample project into your workspace from this page: https://www.8thwall.com/uforodeo/score-system
- Replace increment and decrement geometries with desired objects/models
- If you change the models or names of the and objects be sure to update their references in the counter components UI drop-downs.
- Preview
- Click the Build button and test on your device or using the simulator. Tapping the increment/decrement objects should update the displayed score and trigger particle effects.
Customization
- Initial Score
- You can modify the field if you’d like a non-zero starting score.
- Particle Effects
- Adjust the properties in (e.g., , , , etc.) to change the look and feel of the particle burst.
- Score UI Styling
- Depending on your chosen type, you can style it via Studios UI system or custom CSS if you’re using 2D HTML overlay.
Troubleshooting
- Score Not Updating
- Ensure you assigned the correct entities in the Inspector for increment, decrement, and score.
- Verify that you have the component attached as a custom component to your counter object.
- No Particle Effects
- Check that the function has a valid sprite and that the entity supports a particle emitter.
Roaming Entities Tutorial
This project showcases how to make roaming 3D entities (in this case, UFOs) using Niantic Studio. You’ll learn how to:
- Assign a custom component to 3D models in your scene.
- Move and animate entities between random positions using a simple state machine.
- Detect collisions and trigger particle effects for visual feedback.
Project Structure
├── assets/│ └── ufo.glb // 3D model of the UFO
├── roaming_entity.ts // Main script defining the roaming_entity component
├── cleanup.ts // Utility for cleaning up event listeners
└── README.md // This README file
Key Files
- Defines a component with a state machine (/) for moving the UFO to random positions.
- Sets up colliders, positions, and collision listeners that trigger particle effects.
- Provides helper functions (, ) to remove events and references when a component is removed.
How It Works
- Roaming Entity Component
- Registered in. The UFO is placed initially at, then assigned a Cylinder collider.
- A collision listener triggers, spawning a brief particle burst.
- State Machine
- PING → PONG cycle:
- On entering each state, the UFO transitions to a new random position via.
- A random delay determines how long before it switches states again, creating continuous roaming.
- PING → PONG cycle:
- Collision Handling
- is used. When the UFO collides, particles are emitted.
- After a short duration, the particle emitter and a rotation animation are removed, resetting the UFO for its next collision.
- Cleanup
- Event listeners for the collision are tracked and later removed to prevent memory leaks, using and.
Getting Started
- Clone This Project
- Clone this sample project into your workspace from this page: https://www.8thwall.com/uforodeo/roaming-entities
- Assign the Component
- If you add or change models/entities from the ufos, ensure you attach the 'roaming_entity.ts' custom component to each.
- Verify or trade out the assets
- If you use your own model, make sure to replace the 'assets/ufo.glb' reference in the 'roaming+entity.ts' component file
- Build & Preview
- Press Build to run or publish the project.
- Watch your objects roam around the scene, occasionally colliding and spawning particle effects.
Customization
- Motion Settings
- Edit to fine-tune random distances or set new min/max positions.
- Adjust in for faster or slower travel.
- Particle Effects
- In , tweak properties such as , , , and to change the burst’s look.
- Collision Shape and size
- Swap out the Cylinder collider for or another shape if you prefer. Change the size to give your objects more space from other objects before colliding.
- Animation Easing
- Experiment with different values (, , , etc.) to personalize the objects movement styl
Troubleshooting
- No Movement
- Ensure the component is attached to each UFO in the Inspector.
- Confirm the state machine transitions ( → ) are being triggered (check console logs).
- No Random Motion
- Check that the function is returning valid numbers.
- Adjust the random range or the minimum positions so they remain in camera view.
Spawning System Tutorial
This project demonstrates how to dynamically spawn 3D entities using a custom “spawner” component in Niantic Studio. You’ll learn how to:
- Automatically load and place multiple instances of a 3D model into the scene.
- Configure spawn settings such as entityAmount and spawnSpeed.
- Use simple ECS state machines to coordinate asset loading and event transitions.
Description
The Spawning System Sample showcases a “spawner” component that periodically creates new 3D entities (e.g., cows). Each spawned entity is given a model, basic animation, a collider, and a random position near the camera. This setup demonstrates how Niantic’s Entity Component System (ECS) can handle multiple objects’ creation and initial configuration on the fly.
Project Structure
Below is a brief overview of the key folders and files:
.
├── assets/ // Additional media assets (the cow.glb model)
├── spawner.ts // Main script defining the Spawner component
└── README.md // This README file
Key Files
- Defines the component, which controls how many entities to spawn, at what interval to spawn them, and how to position them.
- Uses a simple state machine to handle the “loading” phase (spawning entities) and a final “done” state once all objects are created.
Hierarchy Entities Overview
- Spawning System Entity
- An entity that has the component attached.
- Configures references for how many entities to spawn () and the delay between spawns ().
- Spawned Entities (Cows)
- Automatically created during the spawner’s LOADING state.
- Each one receives:
- GltfModel (the cow model).
- ScaleAnimation (scaling up from 0.1 to 1).
- Collider (cylindrical shape).
- A random position near the active camera.
How It Works
- Spawner Component
- Registered in . The ECS references two key properties:
- : Number of entities to spawn.
- : Milliseconds between spawns.
- Registered in . The ECS references two key properties:
- State Machine
- LOADING (initial): Iterates up to, creating a new entity at intervals of.
- Each spawned entity loads a cow model, attaches a ScaleAnimation, and sets its Position and Collider.
- After the loop finishes, a trigger transitions to the DONE state.
- Random Positioning
- For each entity, a random x-coordinate (between -4 and 4) is chosen, while the z-position is offset behind the camera.
- The y-coordinate is slightly above the ground.
- DONE State
- Once all entities are spawned, “all done!” is logged. You can use this state to run additional logic, such as re-triggering the spawns or toggling UI elements.
Getting Started
- Clone or Import This Project
- Open Niantic Lightship Studio and import or clone this sample project into your workspace.
- Assign the Spawner Component
- In the Scene view, create/select an entity and add the component from your project’s Scripts panel.
- Configure in Inspector
- Use the entityAmount field to set how many 3D models you want to spawn.
- Adjust the spawnSpeed (in milliseconds) to control how quickly each model appears.
- Preview
- Press Build or Publish.
- Observe the new entities (cows) spawn near your camera, one by one, until the total is reached.
Customization
- Model & Animation
- Change the in if you want a different model.
- Modify the animation or remove it for a static model.
- Collider Shape
- Try different types (e.g., , ) to experiment with collisions or physics behavior.
- Spawn Pattern
- Adjust the random offsets in to spread entities differently.
- Change or at runtime to create more dynamic experiences.
- Additional Logic
- In the DONE state, you can add extra steps (e.g., display a “spawn complete” UI, trigger a special animation, or re-run the spawner).
Troubleshooting
- Entities Not Appearing
- Ensure is correctly attached to an entity with the component.
- Verify that the file is present in the folder and that the path matches.
- Spawning Too Fast or Slow
- Adjust the value in the Inspector to suit your needs.
- Colliders Not Working
- Make sure the newly spawned entities have valid settings.
Enjoy floating cows and exploring how to dynamically spawn 3D models in your Niantic Studio projects!