8th Wall Blog
Step-by-Step: Building a Game on Top of a Splat in Niantic Studio
Learn how to create a WebXR experience using splats of the real world in Niantic Studio

In our recent workshop, we walked through how to use Niantic Studio to bring in a Gaussian Splat from Scaniverse and build a game on top of it. Watch the recap video or read this step-by-step guide to learn how to import a splat, add physics colliders, animate a car, and configure camera movements—all essential skills for creating interactive, real-world experiences. Follow along to build your own game using these powerful tools.
Step One: Preparing Your Workspace and Importing the Splat
- Clone a New Project: Begin by cloning an empty project in Niantic Studio. This will serve as the base for our workshop. Name it something like "Splat Workshop."
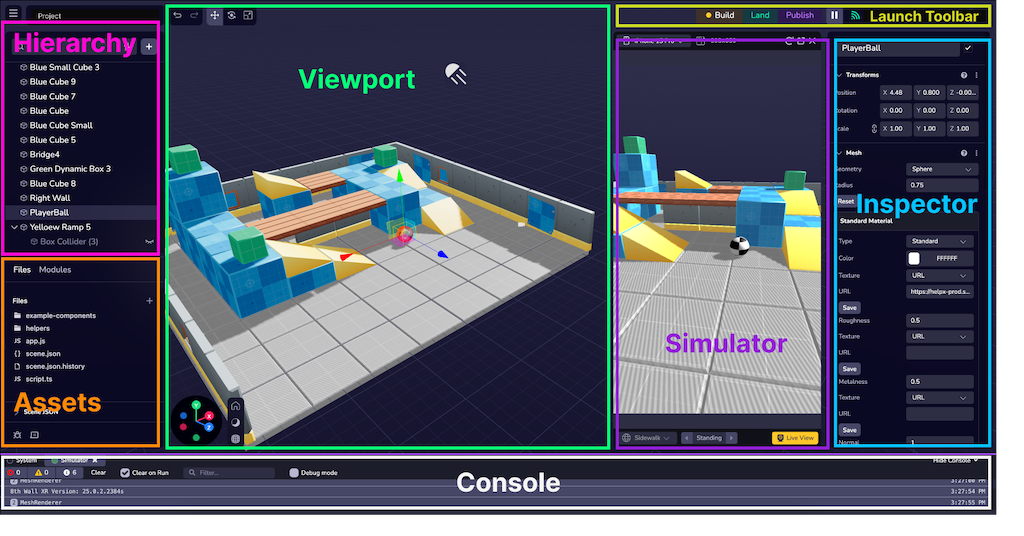
- Interface Overview: Before we build anything, take a moment to familiarize yourself with the Niantic Studio Interface. There are a few key sections we'll refer back to explained below.
- Import the Assets: You'll need three files for this project: the splat (bench.spz), a car model (rover), and the car controller script. Drag and drop these files into the Assets section.

- Hierarchy: Located at the top-left, this is where all objects in the scene are organized.
- Assets: Bottom-left area, where your 3D models, splats, and scripts are located.
- Viewport: Center workspace for scaling, rotating, and positioning objects.
- Inspector: Right side, showing details and settings of selected objects.
- Simulator: Used to preview your project in real time.
Step Two: Adding your Splat and Car
- Add the Splat: From the Assets section, drag and drop the splat file (bench.spz) into the Hierarchy. This will load the splat into your scene. Then, adjust the position to (0, 5, 10) for easier scaling and collider alignment.
- Add the Car: Drag and drop the rover.glb model into the Hierarchy. Rename it to "Car" in the Inspector for clarity. Then, scale the car to 0.2 to ensure it’s proportionate to the splat. A full-size car won’t navigate well!
Step Three: Adding Physics to the Car and Splat
- Add a Physics Collider to the Car:
- Select the car in the Hierarchy.
- In the Inspector, click Add Component and select Physics Collider.
- Set the collider shape to Box. Adjust the width and depth to 3.
- Set Rigidbody to Dynamic so the car can move.
- Adjust your Damping:
- Linear Damping = 0.9
- Angular Damping = 0.9
- Add a Ground Collider: Splat files don’t include physical geometry, so we need to create a ground object for the car to interact with.
- Click + in the Hierarchy and select Box. Rename it to "Ground."
- Adjust its position, scale, and rotation to fit the area under the splat.
- Add a Physics Collider and set it to Static since the ground won’t move.
- In the Hierarchy, hover over the collider's object to reveal the eye icon and click the eye icon to hide the collider.
Step Four: Configuring the Car Controller
In this step, you'll add a car controller script by:
- Selecting the car in the Hierarchy.
- In the Inspector, click Add Component and select Custom Component.
- Choose the car controller script to give the car movement controls.
.gif)
Step Five: Setting Up Input Controls
- Create a New Input Action Map:
- In the Space Settings, go to the Input Manager and create a new action map.
- Select the Fly Controller template, which has pre-configured controls for moving forward, backward, left, and right. - Assign Input Map:
- Set the action map to Fly Controller in the Input Manager to enable movement controls for the car.
Step Six: Adding Camera Movement
- Look At Animation:
- Select the camera in the Hierarchy and click `Add Component in the Inspector`. Choose Look At Animation.
- Set the target to the car, so the camera always faces the car.
- Create a Follower Object:
- Add an empty object in the Hierarchy and name it "Follower."
- Drag the camera into the follower object to make it a child of the follower.
Step Seven: Fine-Tuning Camera with Live Sync
Ready to see your scene and make adjustments in real time as the scene is running? In this step, we'll enable Live Sync by:
- In the Space Settings, toggle Live Sync to make real-time adjustments while the scene is running.
- Build and play the scene. Use the Gizmo tool to adjust the camera’s position while driving the car.
Step Eight: Testing and Expanding
- Test the Scene: Build and play the scene. Use the arrow keys or W-A-S-D to drive the car around the splat. The camera will follow the car as it moves.
- Add More Colliders: If you want more interaction, add additional colliders to represent obstacles or other parts of the splat.
- Optional: Expand your game by turning the splat into an obstacle course or adding new animations for the car’s movement.
By following these steps, you've learned how to bring a Gaussian Splat into Niantic Studio and create an interactive game experience. Whether you're exploring real-world environments or building unique mechanics on top of splats, the skills you've gained—importing assets, adding physics, and configuring animations—will help you craft immersive WebXR projects. We can’t wait to see what you build next! Be sure to share your creations with the community and keep experimenting with all the tools Niantic Studio has to offer.
.png)